
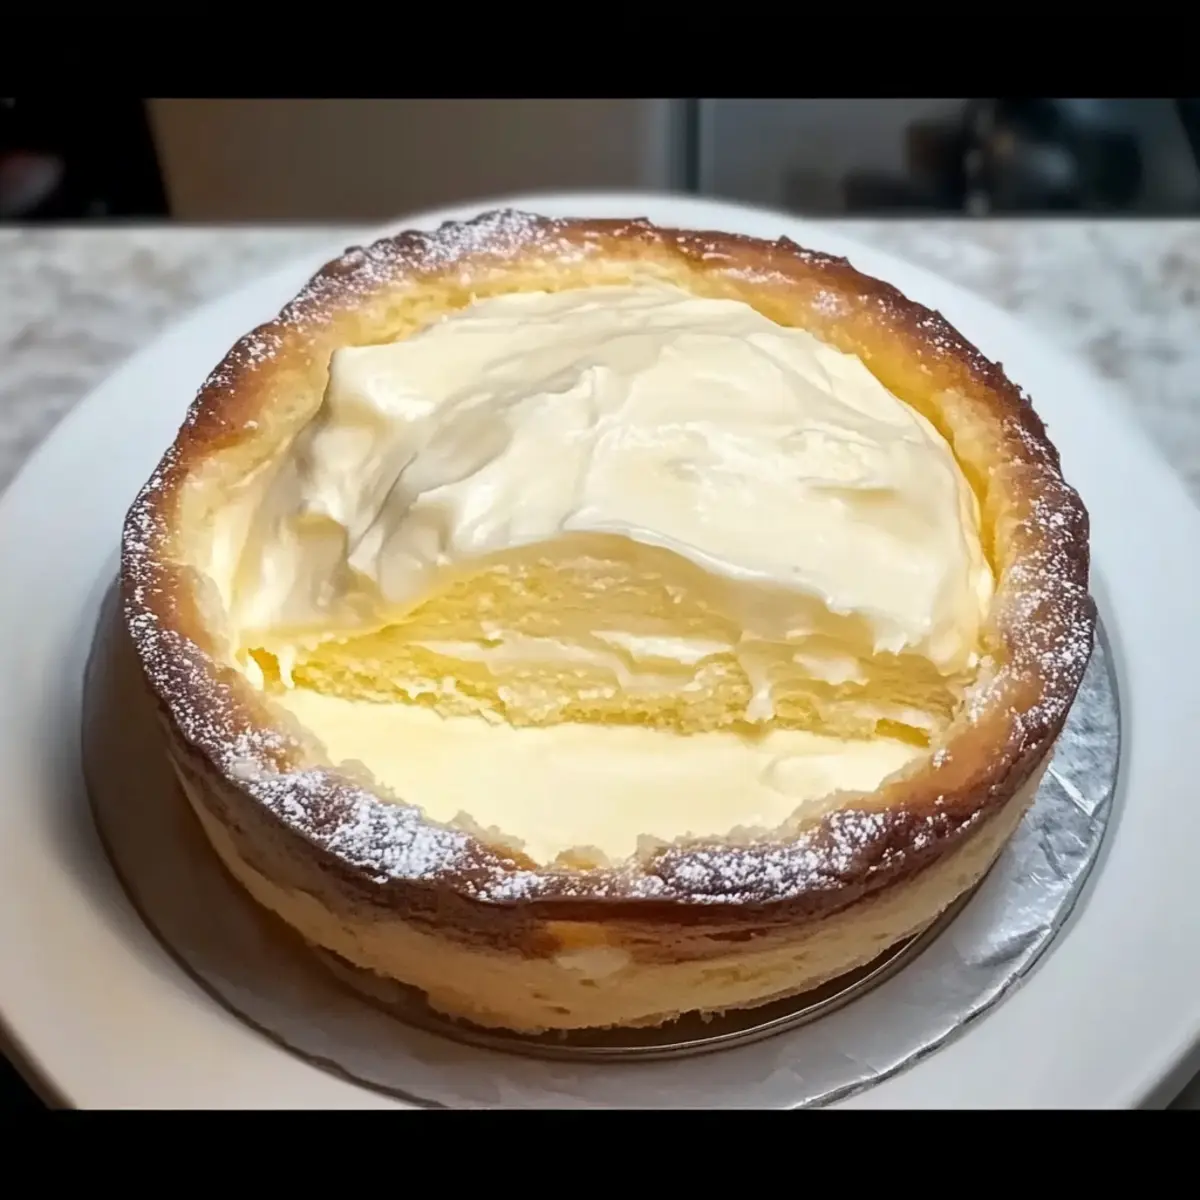
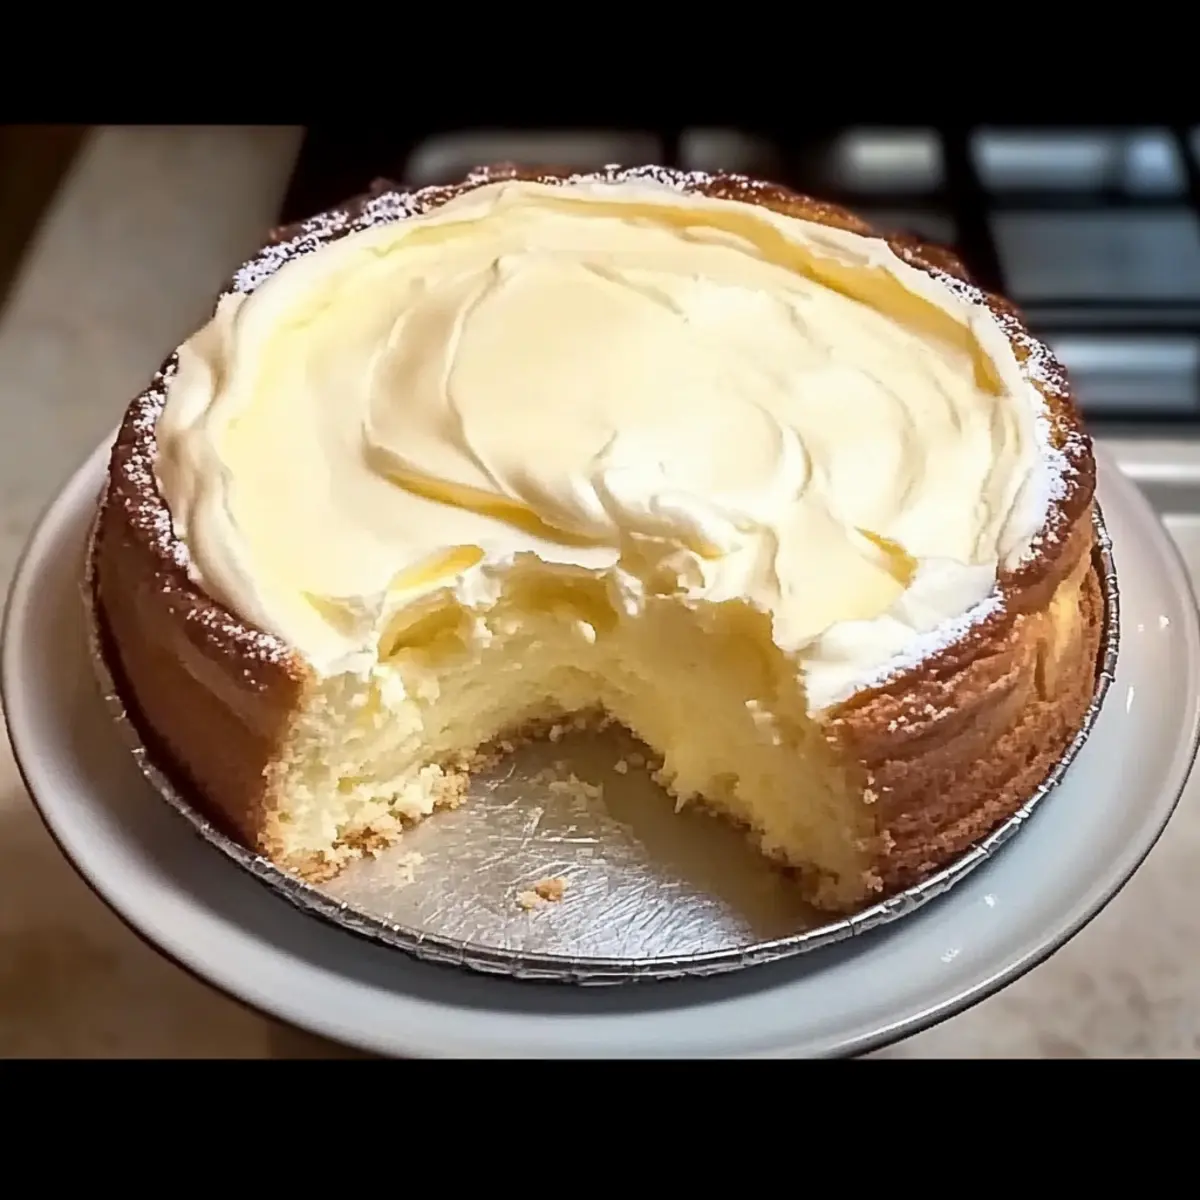
In the midst of a bustling kitchen, the aroma of warm butter and sweet cream fills the air, promising a delightful experience ahead. This is the magic of the Melt-in-Your-Mouth Cake, a wonderful Polish dessert that’s not just a feast for the taste buds but also incredibly easy on the wallet. With its soft, buttery layers and a rich, creamy filling, this affordable dessert is not only a perfect finale for any meal but also a genuine crowd-pleaser for gatherings. It’s a wonderful way to bring a touch of elegance to your table without the stress of complicated preparations. Have you ever thought about how one simple cake could transform your next celebration? Let’s explore this delightful recipe together!

Why is Melt-in-Your-Mouth Cake a Must-Try?
Irresistible Texture: The soft layers of this cake practically melt in your mouth, giving you a silky, indulgent experience with each bite.
Budget-Friendly: Made with simple, affordable ingredients, this dessert won’t break the bank while still impressing your guests.
Versatile Delight: Whether you enjoy it plain, with berries, or even opt for a fruity filling, the options for customization are endless.
Easy Preparation: This recipe is straightforward enough for beginners, ensuring that everyone can enjoy the satisfaction of homemade baking.
Cultural Heritage: Rooted in Polish traditions, this cake brings a slice of rich culinary history to your table, making every bite special.
Pair this cake with a delightful cup of tea or serve it alongside a scoop of ice cream for a delightful finish to any meal!
Melt-in-Your-Mouth Cake Ingredients
Discover the key components for creating this delightful Polish dessert!
For the Cake Layers
- Butter (80 grams, ⅓ cup) – Provides richness and flavor; substitute with margarine for a dairy-free version.
- Milk (100 ml) – Adds moisture and a slight sweetness; try almond or oat milk for a lactose-free option.
- Water (100 ml) – Helps create a light texture by hydrating the flour; no substitutes needed.
- Salt (½ teaspoon) – Enhances flavor; essential for balancing sweetness.
- Flour (500 grams, 4 cups) – Forms the cake base and structure; gluten-free flour works for a gluten-free version.
- Baking Powder (1 teaspoon) – Provides leavening for a light cake; always ensure it’s fresh for the best results.
- Eggs (4) – Binds the ingredients and adds moisture; flax eggs can be used for a vegan alternative.
For the Cream Filling
- Sugar (150 grams, ¾ cup) – Sweetens the cream filling; reduce the amount for a less sweet option.
- Additional Flour (100 grams, 1 cup) – Required for the cream filling; use the same type of flour throughout the recipe.
- Milk (100 ml) – Adds creaminess to the filling; see the note above for alternatives.
Optional Garnish
- Icing Sugar – Adds a decorative touch; swap with cocoa powder for a chocolatey finish.
With these ingredients, you’re well on your way to creating a captivating Melt-in-Your-Mouth Cake that will leave everyone wanting more!
Step‑by‑Step Instructions for Melt-in-Your-Mouth Cake
Step 1: Prepare Dough
Begin by melting the butter in a saucepan over low heat. Once melted, add milk, water, and salt; stir until well combined. Heat this mixture until it begins to boil gently, which usually takes about 3–5 minutes. You’ll want to see little bubbles forming on the surface to indicate readiness.
Step 2: Mix Dry Ingredients
In a large mixing bowl, whisk together the flour and baking powder until evenly combined. This step is crucial, as it ensures the dry ingredients are well-balanced, setting the foundation for a fluffy Melt-in-Your-Mouth Cake. Keep this bowl nearby, as you’ll be adding it to the wet mixture shortly.
Step 3: Combine Mixtures
Once your liquid mixture is boiling, gradually add the dry ingredients to the saucepan while stirring continuously. This process will help prevent lumps from forming. Keep cooking and mixing for about 5-7 minutes, or until the dough starts pulling away from the sides of the pan, forming a cohesive ball.
Step 4: Cool and Add Eggs
Remove the saucepan from heat and let the dough cool for about 10 minutes. Once slightly cooled, add the eggs one at a time, mixing well after each addition. The dough should become smooth and slightly sticky, which is essential for the perfect texture of your Melt-in-Your-Mouth Cake.
Step 5: Bake Layers
Preheat your oven to 400°F (200°C). Divide the dough into two equal parts and spread each half evenly into a lined 25cm round baking pan. Bake in the preheated oven for about 20 minutes, or until the edges are lightly golden and a toothpick inserted in the center comes out clean.
Step 6: Make Cream Filling
While the cake layers bake, prepare the cream filling. In a medium saucepan, beat the eggs and sugar together until pale. Add the flour and milk while whisking to prevent lumps. Cook over medium heat for about 5–7 minutes until the mixture thickens, stirring continuously. Once thickened, cover it and let it cool.
Step 7: Combine Cream
In a mixing bowl, beat the softened butter until fluffy, which should take about 3 minutes. Gradually add the cooled cream mixture, mixing well until silky and well incorporated. This fluffy cream will be the luscious filling of your Melt-in-Your-Mouth Cake, bringing richness to each bite.
Step 8: Assemble Cake
Once your cake layers have cooled, place one layer on a serving plate. Spread half of the cream filling evenly over this layer, followed by the second layer of cake. Top with the remaining cream, smoothing it out carefully for a beautiful presentation, embodying the elegance of the Melt-in-Your-Mouth Cake.
Step 9: Chill
Cover the assembled cake and refrigerate it for at least 2 hours. This chilling time allows the filling to set, making the cake easier to slice and enhancing the flavors. Plan ahead, as this step is essential for a delightful dessert experience.
Step 10: Serve
Before serving, dust the top with icing sugar for an added touch of sweetness and elegance. Slice your Melt-in-Your-Mouth Cake into generous portions and reveal those beautiful layers of cake and cream, delighting your guests with every bite!
Make Ahead Options
The Melt-in-Your-Mouth Cake is a fantastic option for busy home cooks looking to save time during the week! You can prepare the cake layers up to 24 hours in advance by baking and cooling them, then storing them wrapped tightly in plastic wrap. The cream filling can also be made ahead of time and kept in the refrigerator for up to 3 days; just make sure to let it cool completely before refrigerating to maintain its silky texture. When you’re ready to serve, simply assemble the cake and let it chill for at least 2 hours. This way, your dessert will not only be easier to manage but also just as delicious!
What to Serve with Melt-in-Your-Mouth Cake?
Elevate your dessert experience with perfect pairings that enhance the delightful flavors of this luscious cake.
-
Creamy Vanilla Ice Cream: The smoothness of vanilla ice cream complements the cake’s soft texture, making each bite a heavenly treat.
-
Fresh Berries: Strawberries, blueberries, or raspberries add a vibrant, tart contrast that balances the sweetness of the cake beautifully.
-
Whipped Cream: Light and fluffy whipped cream enhances the rich cream filling, creating an indulgent experience perfect for special occasions.
-
Citrus Sorbet: A refreshing citrus sorbet provides a bright, zesty finish, cleansing the palate between bites of the rich Melt-in-Your-Mouth Cake.
-
Chocolate Sauce: Drizzling warm chocolate sauce over each slice adds a decadent chocolatey twist that chocolate lovers will adore.
-
Espresso or Coffee: A strong cup of coffee or espresso pairs wonderfully with the cake, enhancing the flavors and making for a delightful afternoon pick-me-up.
-
Fruity Tea: A chilled berry or hibiscus tea offers a refreshing twist, the fruity notes perfectly complement the cake’s creamy filling.
-
Lemon Zest Garnish: Sprinkling freshly grated lemon zest on top not only adds color but also a burst of citrus flavor that brightens every bite of cake.
Expert Tips for Melt-in-Your-Mouth Cake
- Cool Properly: Allow the dough to cool sufficiently before adding the eggs; this prevents them from scrambling and ensures a smooth batter.
- Egg Incorporation: Mix in the eggs one at a time until completely smooth. This step is crucial for achieving the desired texture of your Melt-in-Your-Mouth Cake.
- Baking Precision: Keep an eye on your baking time! Overbaking can make the layers dry; they should be golden and spring back when lightly touched.
- Monitor Cream Cooking: Stir the cream filling continuously while cooking to avoid lumps and ensure a silky final product.
- Chill Thoroughly: Don’t skip the chilling step! Refrigerating the cake allows the flavors to meld and makes it easier to slice beautifully.
- Experiment with Flavors: Feel free to customize the filling with lemon zest or cocoa powder for a personal touch on your Melt-in-Your-Mouth Cake!
Melt-in-Your-Mouth Cake Variations
Feel free to explore these delightful twists to make your cake experience even more enjoyable!
-
Citrus Burst: Incorporate lemon zest into the cream filling for a refreshing citrus kick that brightens each bite. This subtle addition makes the cake feel even lighter and more cheerful.
-
Chocolate Indulgence: Add cocoa powder to the dough to create a rich chocolate version of this classic cake. Imagine the surprise on your guests’ faces when they discover this twist!
-
Fruit Preserve Filling: Replace the cream with your favorite fruit preserves for a fruity delight that adds a burst of flavor and a cheerful color to your cake. Simple yet impactful, it’s a wonderful way to personalize your dessert.
-
Vegan Delight: Swap eggs for flax eggs and use almond or oat milk to create a delicious vegan version that remains just as satisfying and rich as the original. This option ensures everyone can indulge in the joy of this cake!
-
Nutty Flavor: Fold in chopped nuts, like walnuts or hazelnuts, into the cream filling for a delightful crunch and added richness. The combination of textures will have everyone reaching for seconds.
-
Spice It Up: Add a teaspoon of cinnamon or vanilla extract to the cream filling to enhance the flavor profile, creating a warm and inviting taste that evokes nostalgia. This twist adds a cozy feel that makes it perfect for gatherings.
-
Extra Sweetness: Drizzle honey or maple syrup over each slice before serving for a touch of natural sweetness. It’s a simple enhancement that elevates the melt-in-your-mouth experience even further.
Each variation tells a story and invites you to explore the endless possibilities this delightful cake has to offer. For more delicious ideas, you might also enjoy making a Coconut Cloud Cake or a Blueberry Cream Cake. Happy baking!
How to Store and Freeze Melt-in-Your-Mouth Cake
Fridge: Keep your Melt-in-Your-Mouth Cake in an airtight container for up to 4 days. The flavors deepen as it chills, making every slice even more delightful.
Freezer: For longer storage, slice the cake and wrap servings tightly in plastic wrap, then place them in a freezer-safe bag. It can be frozen for up to 2 months without sacrificing texture or taste.
Reheating: When ready to enjoy, either thaw the cake in the fridge overnight or microwave a slice for about 15-20 seconds for a quick treat.
Serving Tip: Dust with icing sugar just before serving to refresh its presentation after storage, and relish the cake’s melt-in-your-mouth goodness!
Melt-in-Your-Mouth Cake Recipe FAQs
What type of flour should I use for the Melt-in-Your-Mouth Cake?
For the best results, use all-purpose flour as it provides the right structure and texture for the cake. If you need a gluten-free option, you can substitute it with a gluten-free flour blend. Just make sure to check the blend’s proportions, as some may require additional binding agents.
How can I tell if my Melt-in-Your-Mouth Cake layers are baked properly?
After about 20 minutes in the oven, check the layers by inserting a toothpick in the center. If it comes out clean or with a few moist crumbs, your cake layers are done! They should also be a lovely golden brown on the edges and slightly spring back when touched gently.
What is the best way to store leftover Melt-in-Your-Mouth Cake?
Store any leftover cake in the refrigerator within an airtight container for up to 4 days. This method not only helps maintain freshness but actually enhances the flavors as the cake ingredients meld together. If you notice any condensation forming, simply let it air out for a few minutes before sealing to keep the texture just right.
Can I freeze the Melt-in-Your-Mouth Cake, and how?
Absolutely! For up to 2 months of storage, slice the cake into individual pieces. Wrap each slice tightly in plastic wrap, then place them into a freezer-safe bag or container. This method preserves both texture and taste. When you’re ready to enjoy, simply thaw the slices in the refrigerator overnight or microwave them for 15-20 seconds for a quick treat!
Is this cake suitable for those with egg allergies?
If you have an egg allergy or prefer a vegan alternative, you can replace the eggs with flax eggs. To make one flax egg, mix 1 tablespoon of ground flaxseed with 2.5 tablespoons of water and let it sit for about 5 minutes until it thickens. Substitute 4 eggs with 4 flax eggs for a totally egg-free version of your Melt-in-Your-Mouth Cake!

Melt-in-Your-Mouth Cake: An Affordable Sweet Delight
Ingredients
Equipment
Method
- Begin by melting the butter in a saucepan over low heat. Once melted, add milk, water, and salt; stir until well combined. Heat this mixture until it begins to boil gently, which usually takes about 3–5 minutes.
- In a large mixing bowl, whisk together the flour and baking powder until evenly combined.
- Once your liquid mixture is boiling, gradually add the dry ingredients to the saucepan while stirring continuously. Keep cooking and mixing for about 5-7 minutes.
- Remove the saucepan from heat and let the dough cool for about 10 minutes. Once slightly cooled, add the eggs one at a time, mixing well after each addition.
- Preheat your oven to 400°F (200°C). Divide the dough into two equal parts and spread each half evenly into a lined 25cm round baking pan. Bake for about 20 minutes.
- In a medium saucepan, beat the eggs and sugar together until pale. Add the flour and milk while whisking to prevent lumps. Cook over medium heat for about 5–7 minutes until the mixture thickens.
- In a mixing bowl, beat the softened butter until fluffy. Gradually add the cooled cream mixture, mixing well until silky and well incorporated.
- Once your cake layers have cooled, place one layer on a serving plate. Spread half of the cream filling evenly over this layer, followed by the second layer of cake.
- Cover the assembled cake and refrigerate it for at least 2 hours. This chilling time allows the filling to set.
- Before serving, dust the top with icing sugar for an added touch of sweetness and elegance. Slice your cake into generous portions.
Leave a Reply