
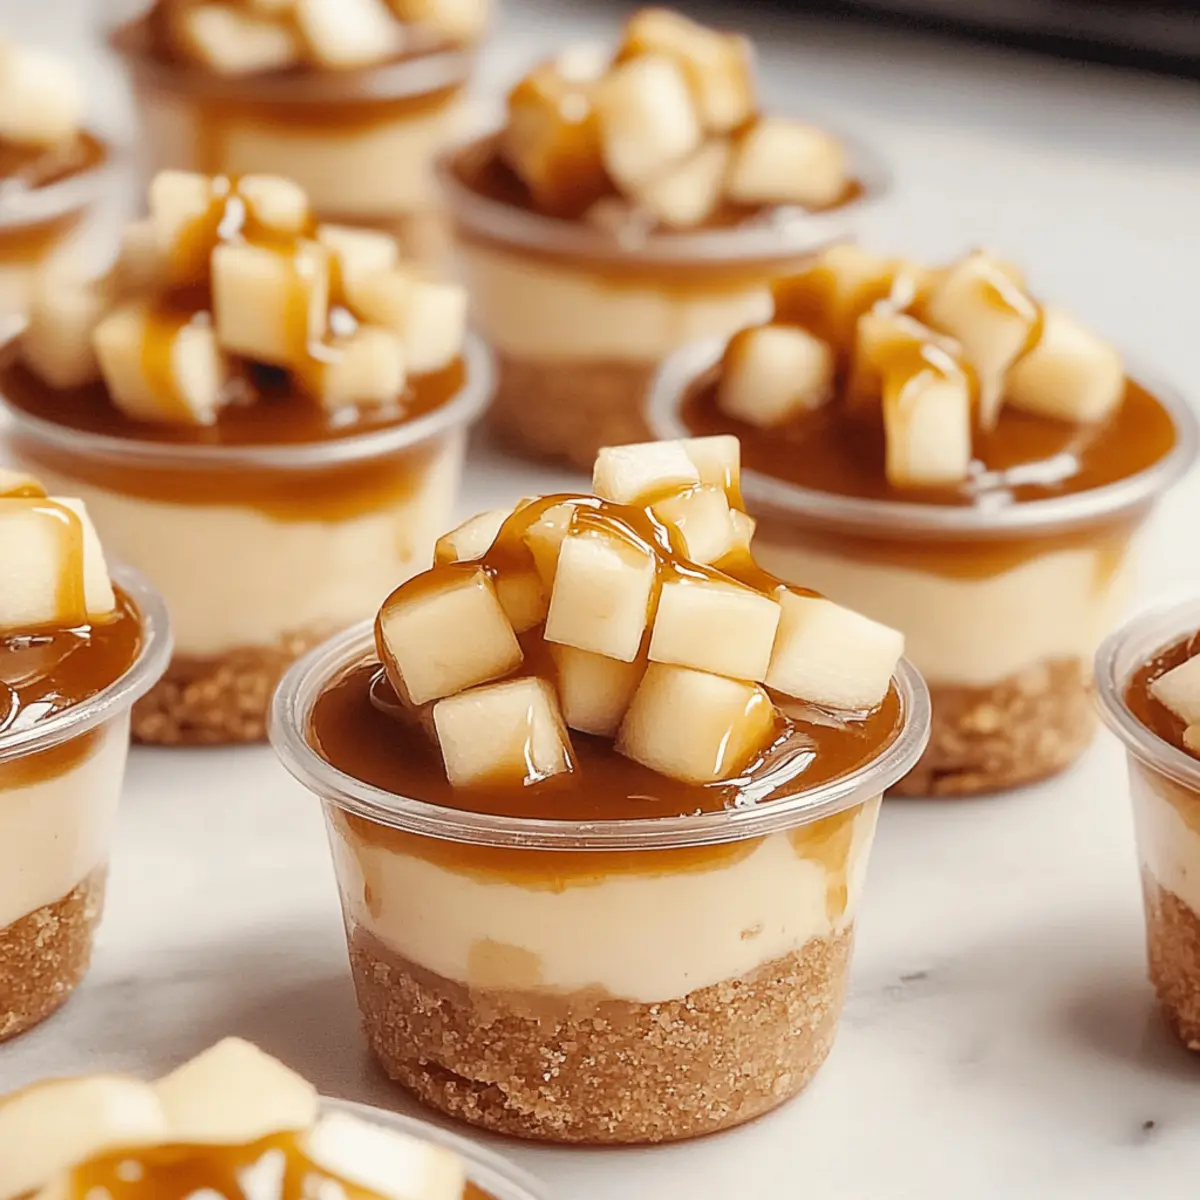
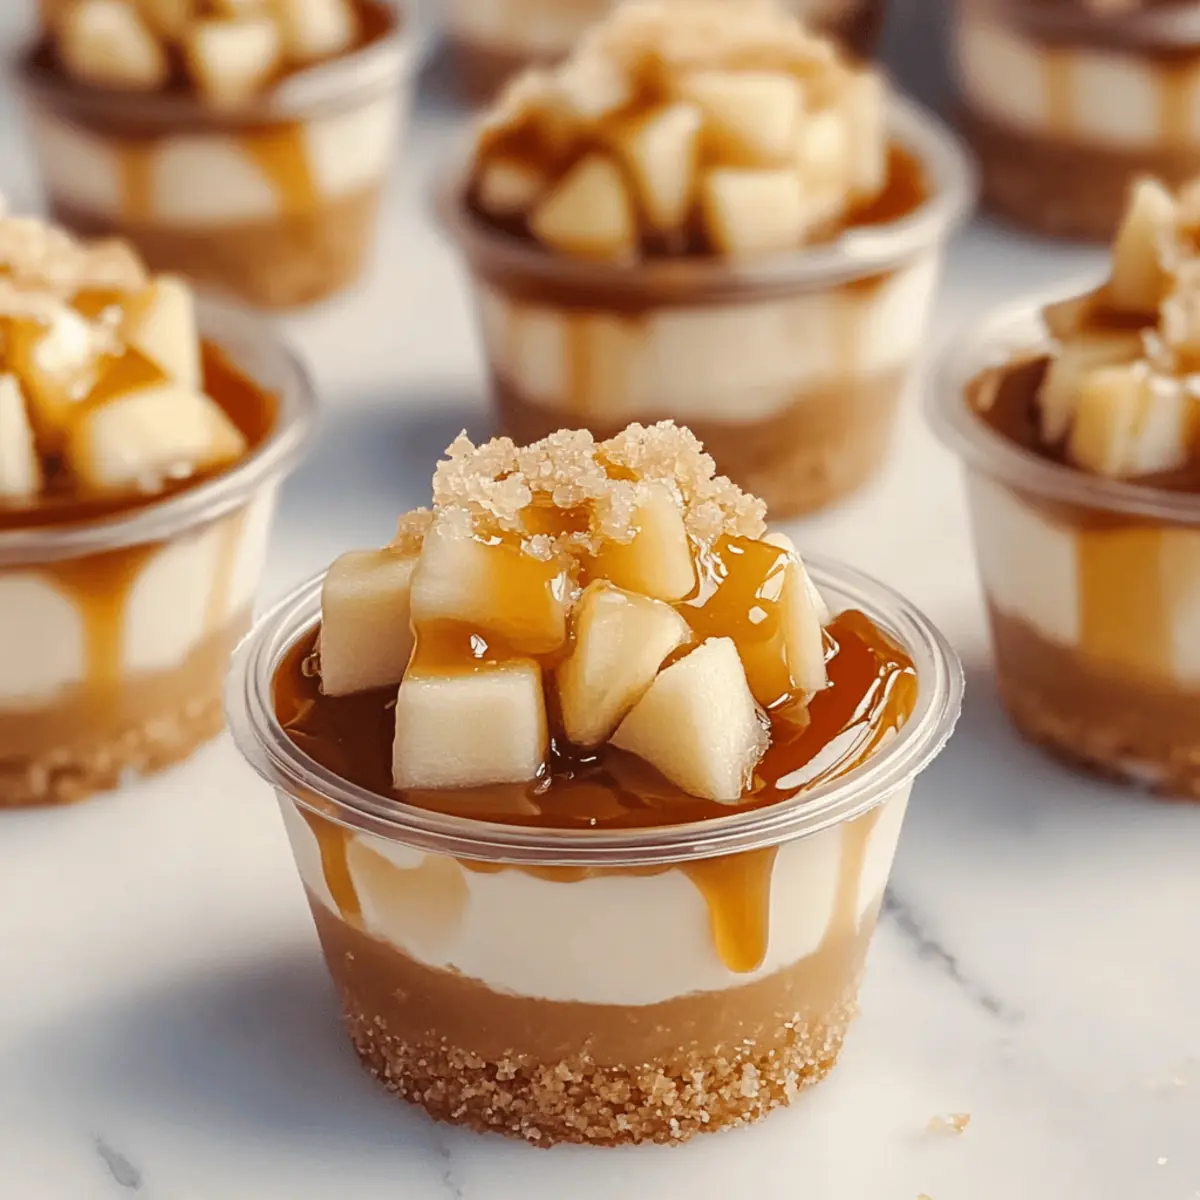
As autumn settles in, the air fills with the sweet scent of caramel and the snap of tart apples. It’s the perfect time to indulge in these Delicious Caramel Apple Dessert Cups, a delightful fusion of flavors that embodies the season. Crafted with layers of creamy vanilla pudding and a crunchy vanilla wafer crust, this dessert is simple enough for any weeknight yet impressive enough for gatherings. Not only do these cups satisfy your sweet tooth with their lusciousness, but they also offer a fun, deconstructed spin on classic caramel apple treats. The best part? You can easily customize them to suit dietary preferences, making them a versatile addition to your recipe repertoire. Ready to treat yourself and your loved ones to a cozy taste of fall? Let’s dive into this layered delight!
Why are these dessert cups so special?
Comforting layers: With tart apples and rich caramel, every bite offers the perfect balance of flavors.
Customization made easy: Perfect for various dietary needs, you can switch up the ingredients to create a nut-free or dairy-free version—just like how you might enjoy these Brownie Mix Cookies for a unique treat!
Visually stunning: The layered presentation not only looks beautiful but also makes serving a breeze, whether for everyday enjoyment or a gathering.
Quick preparation: You’ll love how simple it is to whip up these cups, allowing you to focus on the fun part—spending time with loved ones!
Seasonal delight: This recipe captures the essence of fall, making it a must-try addition to your autumn repertoire. Enjoy with a scoop of vanilla ice cream or fresh whipped cream, and elevate your dessert game today!
Delicious Caramel Apple Dessert Cups
• Discover the key ingredients for your new favorite autumn treat!
For the Apple Filling
- Granny Smith apples – Their tartness perfectly balances the rich sweetness of caramel; try Honeycrisp for a different taste.
- Light brown sugar – Enhances the apple filling with a warm molasses flavor; substitute with coconut sugar for a healthier twist.
- Salted butter – Adds creaminess to the mixture and binds the crust together; swap in coconut oil for a dairy-free alternative.
- Ground cinnamon – Infuses warmth and aroma, enhancing the fall flavor; you can use pumpkin spice for a festive twist.
For the Crust
- Crushed vanilla wafers – Creates a delightful crunchy base; gluten-free cookies are a great substitute for those with gluten sensitivities.
- Salted caramel sauce – Provides an indulgent topping that elevates each layer; both homemade and store-bought options work beautifully.
For the Cream Layer
- Instant vanilla pudding mix – Contributes a smooth, creamy texture; opt for a vegan pudding mix if needed.
- Cold whole milk – Ensures a rich consistency; use almond or coconut milk for a dairy-free version.
- Cold heavy whipping cream – Adds a lightness when whipped, creating an airy mouthfeel; consider a dairy-free whipped topping for an easy swap.
- Extra caramel sauce – Drizzle generously on top; a sprinkle of sea salt enhances the flavors beautifully.
These Delicious Caramel Apple Dessert Cups are ready to be crafted into a delightful treat that you and your loved ones will cherish!
Step‑by‑Step Instructions for Delicious Caramel Apple Dessert Cups
Step 1: Prepare Apple Filling
Begin by dicing 2–3 Granny Smith apples and placing them in a mixing bowl. Add 1/2 cup of light brown sugar, 2 tablespoons of salted butter, and 1 teaspoon of ground cinnamon. Let this mixture sit for about 15 minutes, allowing the ingredients to meld together. The apples should soften slightly, becoming glossy with melted butter and sugar.
Step 2: Make the Crust
In a separate bowl, combine 1 cup of crushed vanilla wafers with 4 tablespoons of melted salted butter until the mixture resembles wet sand. This should take about 2 minutes of stirring. Once ready, evenly pack the crust into the bottom of your serving cups. Use the back of a spoon to ensure it’s well-compressed and forms a solid base.
Step 3: Whisk the Pudding
For the creamy layer, mix 1 package of instant vanilla pudding mix with 2 cups of cold whole milk in a bowl. Whisk vigorously for 2–3 minutes until the mixture thickens and becomes smooth. You should see a transformation as it turns into a lush, creamy pudding. Set this aside for a moment while you prepare the whipped cream.
Step 4: Whip Cream
In a chilled bowl, pour 1 cup of cold heavy whipping cream. Using an electric mixer, whip the cream on medium speed until soft peaks form, approximately 3–4 minutes. This light, fluffy whip will enhance the pudding layer. Carefully fold the whipped cream into the pudding mixture until fully combined, creating a silky blend.
Step 5: Layer the Dessert Cups
To assemble your Delicious Caramel Apple Dessert Cups, start by spooning a layer of the apple mixture into each cup. Follow this with a layer of the crumbled cookie crust. Add a generous layer of the creamy pudding on top. Repeat these layers, if desired, alternating apple, crust, and pudding until the cups are filled to your liking.
Step 6: Drizzle Caramel Sauce
Now, take your salted caramel sauce and generously drizzle it over the top of each dessert cup. Allow about 2 tablespoons per cup, ensuring every bite will be deliciously sweet. For an extra touch, consider sprinkling a pinch of sea salt over the caramel drizzle to elevate the flavor profile.
Step 7: Chill
Finally, place the assembled dessert cups in the refrigerator and let them chill for at least 1 hour. This step is crucial as it allows the flavors to combine and the layers to set perfectly. When you pull them out, they should feel firm to the touch, making them ready for an impressive serving!

Make Ahead Options
These Delicious Caramel Apple Dessert Cups are a fantastic option for meal prep enthusiasts! You can prepare the apple filling and crust up to 24 hours in advance; simply store the apple mixture in an airtight container in the refrigerator to prevent browning while keeping the crust in a separate bag. The creamy pudding layer can also be made ahead and refrigerated for up to 3 days. When you’re ready to serve, just layer everything in your cups, drizzle with caramel sauce, and chill for an hour to let the flavors meld. This way, you’ll have a stunning dessert ready to impress with minimal last-minute effort!
Delicious Caramel Apple Dessert Cups Variations
Feel free to get creative and customize these delightful dessert cups to suit your taste or dietary preferences.
-
Nut-Free: Replace vanilla wafers with Graham crackers to cater to those with nut allergies.
-
Dairy-Free: Swap out the whole milk for almond or coconut milk and use a dairy-free whipped topping for a creamy texture without the dairy.
-
Sugar-Free: Use sugar substitutes for the brown sugar and caramel sauce—stevia or erythritol work great for an indulgent yet healthier option.
-
Spicy Kick: For a surprising twist, add a dash of cayenne pepper to the apple mixture, creating a delightful contrast of heat and sweet—perfect for adventurous palates.
-
Seasonal Fruit Variation: Switch things up by substituting apples with ripe pears or juicy peaches, depending on what’s fresh and in season.
-
Chocolate Drizzle: Add a touch of decadence by topping your cups with a chocolate sauce drizzle—chocolate and caramel are a match made in heaven!
-
Extra Crunch: For a texture boost, sprinkle some crushed toffee or pecans on top for added crunch in each bite, creating a satisfying experience.
-
Caramel Swirl: Instead of a straight drizzle on top, swirl in softened caramel sauce through the whipped cream layer, adding visual flair and rich caramel flavor.
These variations give you the freedom to tailor your Delicious Caramel Apple Dessert Cups to every occasion or preference. Want more sweet ideas for your dessert repertoire? Check out these scrumptious Zebra Cookies or treat yourself to a slice of Salted Caramel Banana bread for a delightful twist! Enjoy your culinary creativity!
How to Store and Freeze Delicious Caramel Apple Dessert Cups
Fridge: Keep your dessert cups covered with plastic wrap in the refrigerator, and they will stay fresh for up to 3 days. This helps maintain their flavor and texture.
Freezer: For longer storage, consider freezing the components separately—store the apple filling, crust, and whipped cream in airtight containers for up to 2 months.
Reheating: If using frozen components, thaw them in the refrigerator overnight before reassembling. Avoid reheating the pudding layer, as it can lose its creaminess.
Assembly Tip: It’s best to assemble the Delicious Caramel Apple Dessert Cups just before serving to keep the crust crunchy and delightful!
What to Serve with Delicious Caramel Apple Dessert Cups
Transform your dessert into a memorable meal by adding these delightful accompaniments that will warm your hearts and tantalize your taste buds.
-
Vanilla Ice Cream: Creamy and cool, vanilla ice cream beautifully contrasts the warm caramel and tart apples, adding a refreshing touch to each bite.
-
Fresh Whipped Cream: Light and airy, this classic topping enhances the richness of the caramel apple flavors while adding a velvety texture.
-
Spiced Apple Cider: Enjoy a cozy sip of steaming spiced apple cider alongside your dessert. The warm spices echo the autumnal notes in the cups, creating a harmonious experience.
-
Ginger Snaps: Crunchy and slightly spicy, ginger snaps offer a delightful contrast to the creamy cups, making for a delicious texture balance.
-
Chai Tea Latte: The warm spices in a chai tea latte beautifully complement the flavor profile of the caramel apple dessert. It’s the perfect comforting drink for fall evenings.
-
Pecan Pie Bars: Indulge in a slice of pecan pie bars; their nutty sweetness complements the caramel notes and adds a satisfying crunch to your dessert spread.
-
Salted Caramel Coffee: A cup of salted caramel coffee enhances the dessert with a caffeine twist. The coffee’s bitterness contrasts nicely with the sweetness of the dessert cups.
-
Cheesecake Bites: For a decadent touch, serve cheesecake bites on the side. Their creamy richness provides an offset to the crunchy layers in the dessert cups.
Elevate your dessert experience with these delightful pairings, and make each bite truly unforgettable!
Expert Tips for Delicious Caramel Apple Dessert Cups
-
Chill Time is Key: Allow a minimum of 1 hour in the refrigerator for the flavors to meld and layers to set. Skipping this can lead to a watery dessert.
-
Perfect Whipped Cream: If your whipped cream is too thick, gently add cold milk, a tablespoon at a time, to achieve the desired consistency without losing airiness.
-
Maintain Crunchiness: Assemble the dessert cups just before serving. If done in advance, the crust may become soggy and lose its delightful crunch.
-
Layering Technique: For aesthetic appeal, try to create distinct layers when assembling. Be gentle while layering to keep the beautiful presentation of your Delicious Caramel Apple Dessert Cups.
-
Creative Toppings: Go beyond caramel sauce; try drizzling chocolate or adding crushed nuts for extra flavor and texture. Don’t forget to sprinkle a bit of sea salt for gourmet flair!

Delicious Caramel Apple Dessert Cups Recipe FAQs
What kind of apples should I use for the filling?
Absolutely! Granny Smith apples are a fantastic choice due to their tartness, which beautifully contrasts the rich caramel. You can also swap them for Honeycrisp apples if you prefer a slightly sweeter flavor profile. Just be sure to avoid overly soft apples, as they won’t hold up well in the filling.
How should I store my dessert cups?
Very! Cover your dessert cups with plastic wrap and store them in the refrigerator for up to 3 days. This will help keep the layers fresh and flavorful. If you see any dark spots or sogginess on the crust, it’s best to consume them sooner rather than later to maintain that delightful crunch.
Can I freeze the components of the dessert cups?
Of course! For longer storage, you can freeze the components separately. For freezing: place the apple filling, crust, and whipped cream in airtight containers. These can last up to 2 months in the freezer. When you’re ready to enjoy, thaw them overnight in the refrigerator and assemble just before serving to ensure the crust stays crunchy.
What if my whipped cream is too thick?
No worries at all! If your whipped cream turns out thicker than desired, add cold milk gradually, about one tablespoon at a time, while gently folding. This will help restore the creamy consistency while retaining the lovely airiness you want. Just be patient and keep an eye on the texture until it’s perfect.
Are there any dietary considerations for this recipe?
Definitely! This recipe is versatile and can cater to various dietary needs. If you need a nut-free version, you can use Graham crackers instead of vanilla wafers. For a dairy-free twist, swap cold whole milk with almond or coconut milk and use dairy-free whipped topping. You can even make it sugar-free by using suitable substitutes for brown sugar and caramel. The more the merrier when it comes to customization!
How long should I let the dessert cups chill before serving?
I often recommend a minimum chill time of 1 hour in the refrigerator. This allows the flavors to meld beautifully and the layers to set properly. If you’re in a hurry, even 30 minutes can help, but for the best results and a firm structure, an hour is ideal.
Delicious Caramel Apple Dessert Cups for Cozy Fall Nights
Ingredients
Equipment
Method
- Dice 2–3 Granny Smith apples and mix with 1/2 cup light brown sugar, 2 tablespoons salted butter, and 1 teaspoon ground cinnamon. Let sit for 15 minutes.
- In another bowl, combine 1 cup crushed vanilla wafers with 4 tablespoons melted salted butter. Pack into serving cups.
- Mix 1 package instant vanilla pudding mix with 2 cups cold whole milk. Whisk for 2-3 minutes until thick.
- Whip 1 cup cold heavy whipping cream until soft peaks form. Fold into pudding mixture.
- Layer dessert cups with apple mixture, crust, and pudding. Repeat layers as desired.
- Drizzle salted caramel sauce on top, about 2 tablespoons per cup, and optionally sprinkle sea salt.
- Refrigerate for at least 1 hour before serving.
Leave a Reply