
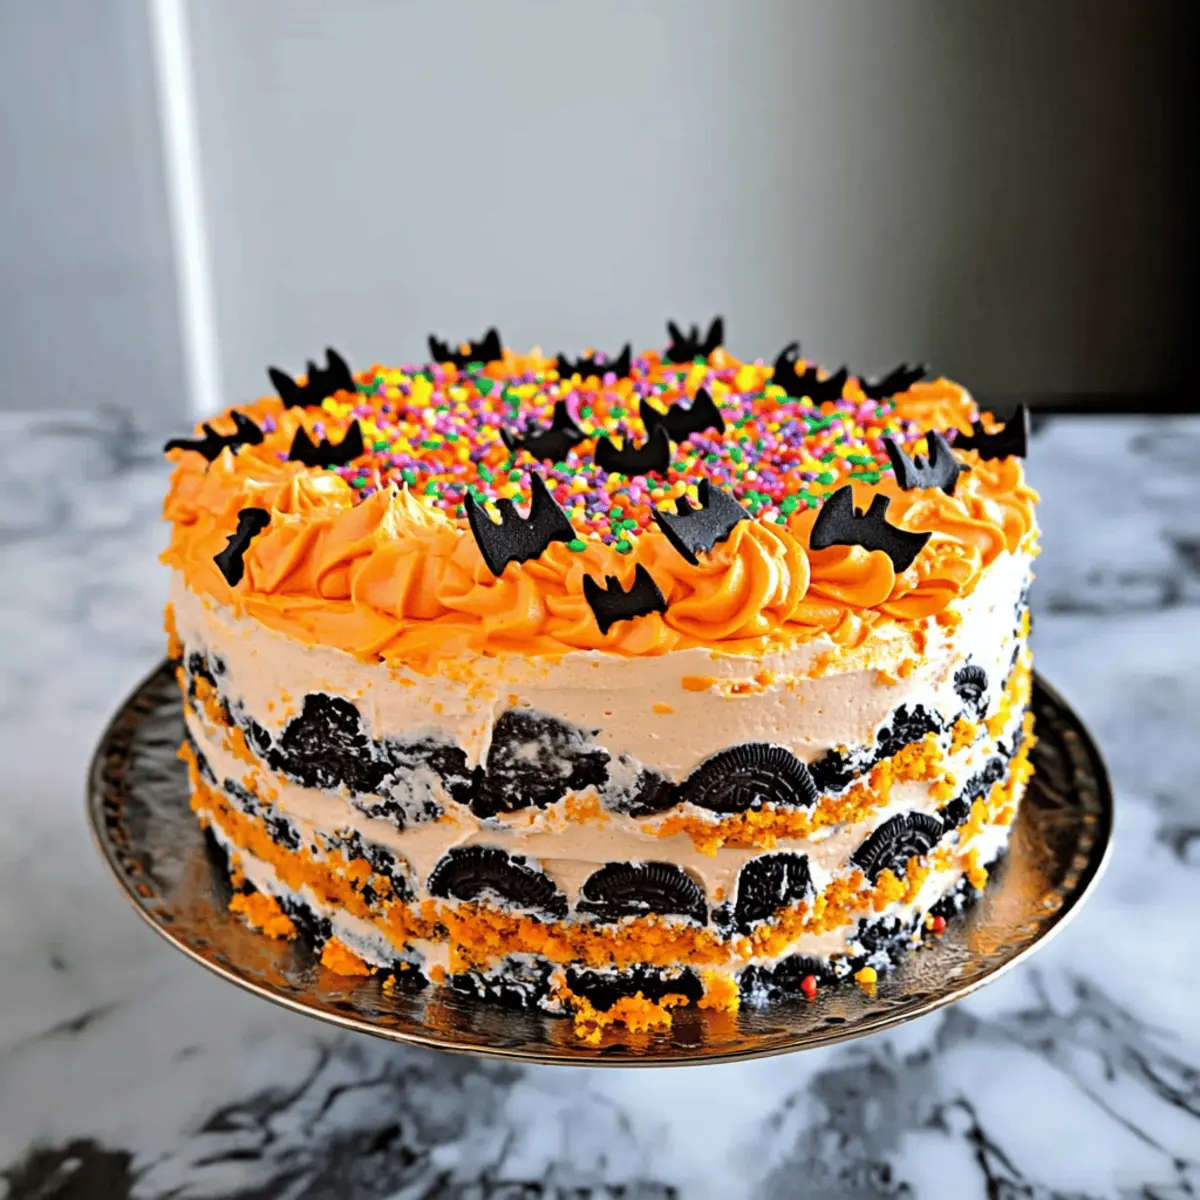
As autumn leaves begin to fall, the excitement for spooky festivities fills the air, urging us to gather for sweet treats. That’s where my No-Bake Halloween Icebox Cake comes in—an irresistibly creamy dessert that assembles in a snap, making it the ultimate solution for busy holiday baking. Layered with crunchy Oreo cookies and billowing whipped cream, this cake not only appeals with its delightful flavors but also guarantees to wow your guests with its festive design. Plus, it’s completely customizable, allowing you to let your creativity shine with fun decorations like colorful bat sprinkles! Ready to add a showstopper to your Halloween celebration? Let’s dive into this deliciously easy recipe!
Why is this Halloween Icebox Cake a must-try?
Effortless Preparation: The no-bake nature of this cake means less time in the kitchen and more time enjoying spooky festivities with friends and family.
Festive Appearance: With colorful whipped cream and themed decorations, it’s sure to impress at any Halloween gathering.
Rich and Creamy Layers: The contrast between the fluffy whipped cream and crunchy Oreo cookies creates an indulgent experience that’s hard to resist.
Versatile Customization: Feel free to swap the decorations based on your preferences—try adding layers of fruit or changing the cookie types for a delightful twist!
Family-Friendly Fun: This is a cake that even the kids can help decorate, making it a perfect activity for family bonding.
Plus, if you’re looking for more delicious desserts, check out my Coconut Cloud Cake or the delightful Strawberry Shortcake Ice Cream Cake!
Halloween Icebox Cake Ingredients
For the Whipped Cream:
• Heavy Whipping Cream – Provides richness and creaminess for the filling; substitute with coconut cream for a dairy-free option.
• Vanilla Extract – Enhances the flavor of the whipped cream; use almond extract for a different taste profile.
• Powdered Sugar – Adds sweetness and stabilizes the whipped cream; granulated sugar can be used but may not dissolve as smoothly.
• Orange Food Coloring (Gel) – Colors the whipped cream for a Halloween theme; use other colors to match different holidays or occasions.
For the Cake Layers:
• Oreo Cookies – The primary structure of the cake that provides flavor and texture; gluten-free Oreo alternatives can be used for a gluten-free version.
For Decoration:
• Orange Icing – Used for decoration, adds sweetness and visual appeal; swap with chocolate or white icing as desired.
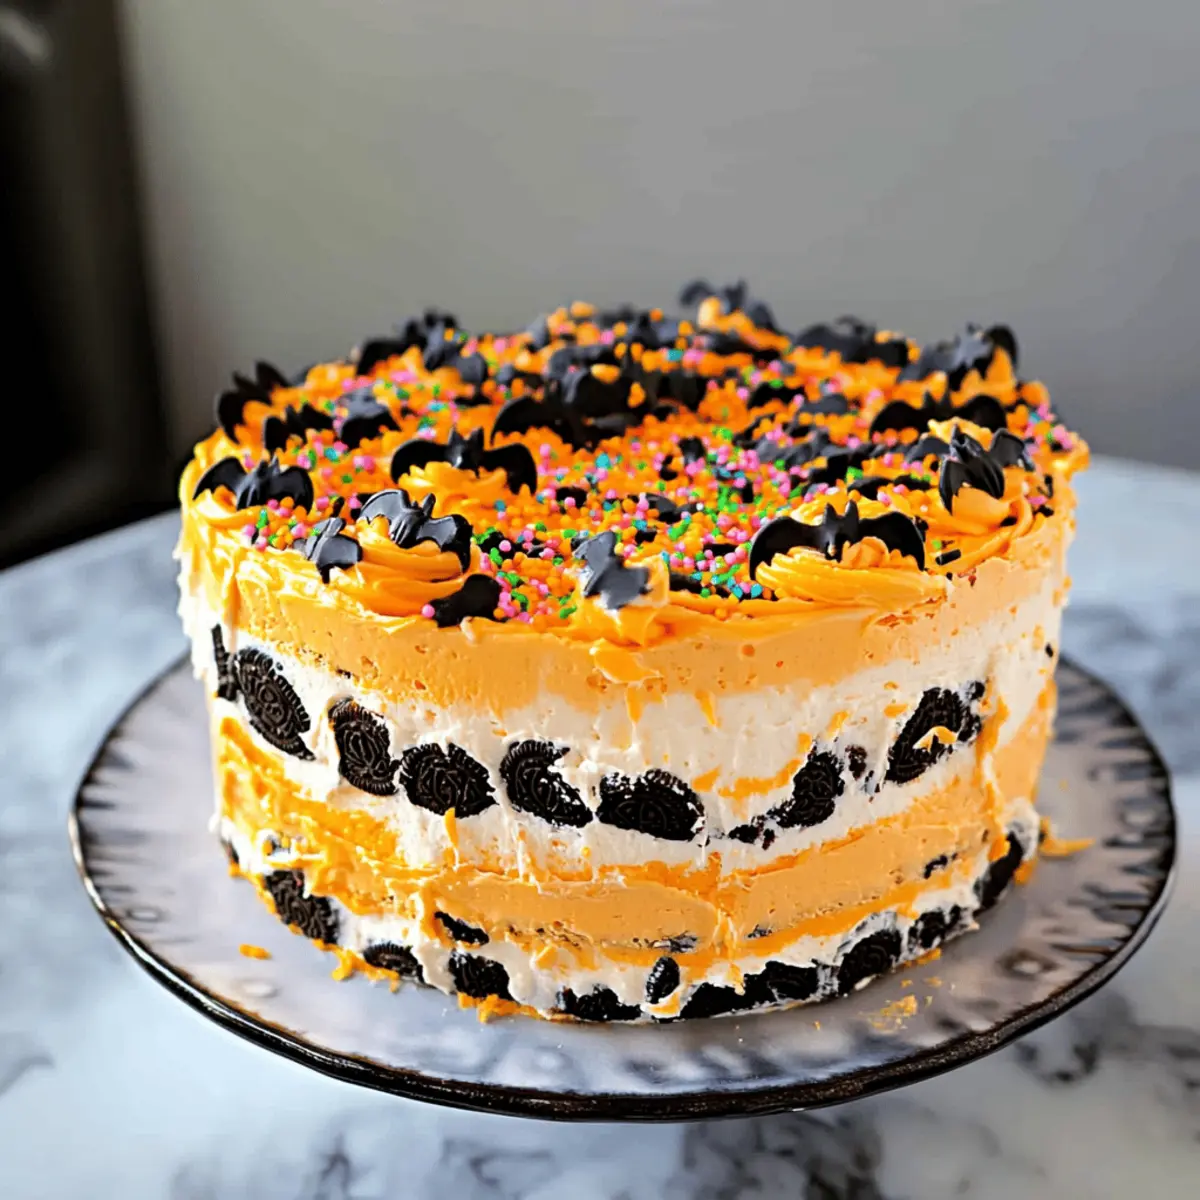
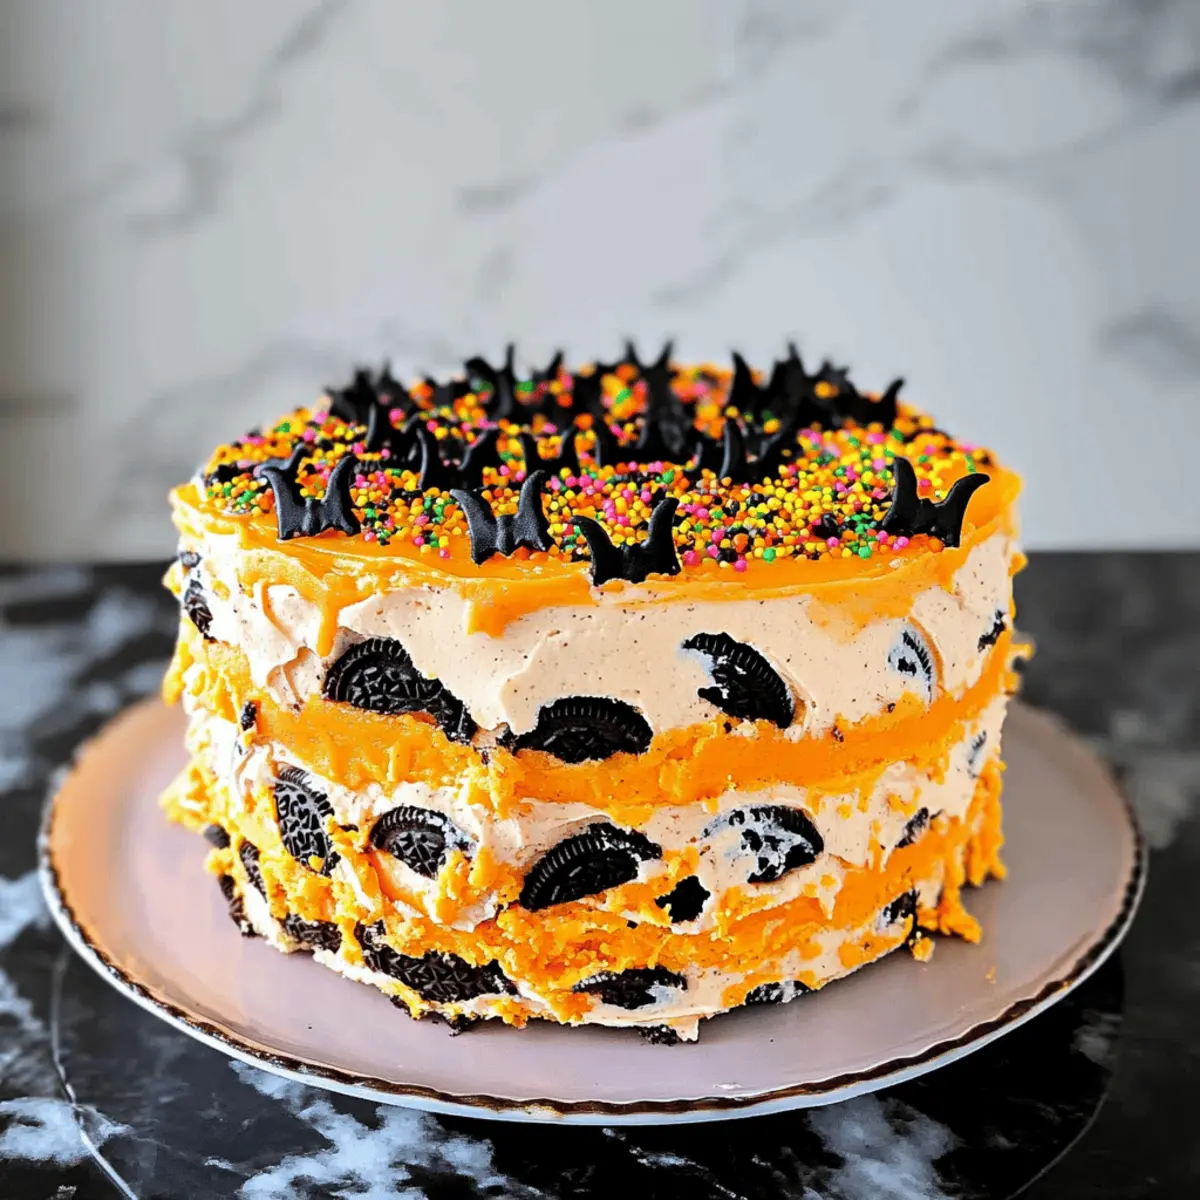
• Sprinkles – Additional festive decoration to enhance the cake’s appearance; choose from various themed sprinkles like bats to celebrate the Halloween Icebox Cake.
Step‑by‑Step Instructions for Halloween Icebox Cake
Step 1: Prepare the Pan
Begin by lining a 9-inch springform pan with plastic wrap or parchment paper, making sure it extends up the sides for easy removal later. This will create a neat presentation for your Halloween Icebox Cake. Ensure the lining is secure and smooth to avoid any creases that could mar the cake’s appearance.
Step 2: Whip the Cream
In a large mixing bowl, pour the heavy whipping cream and add the vanilla extract and powdered sugar. Using an electric mixer on high speed, whisk the mixture for about 5 minutes until you achieve stiff peaks. You’ll know it’s ready when the cream holds its shape and has a luscious, fluffy texture that’s perfect for your cake layers.
Step 3: Color the Cream
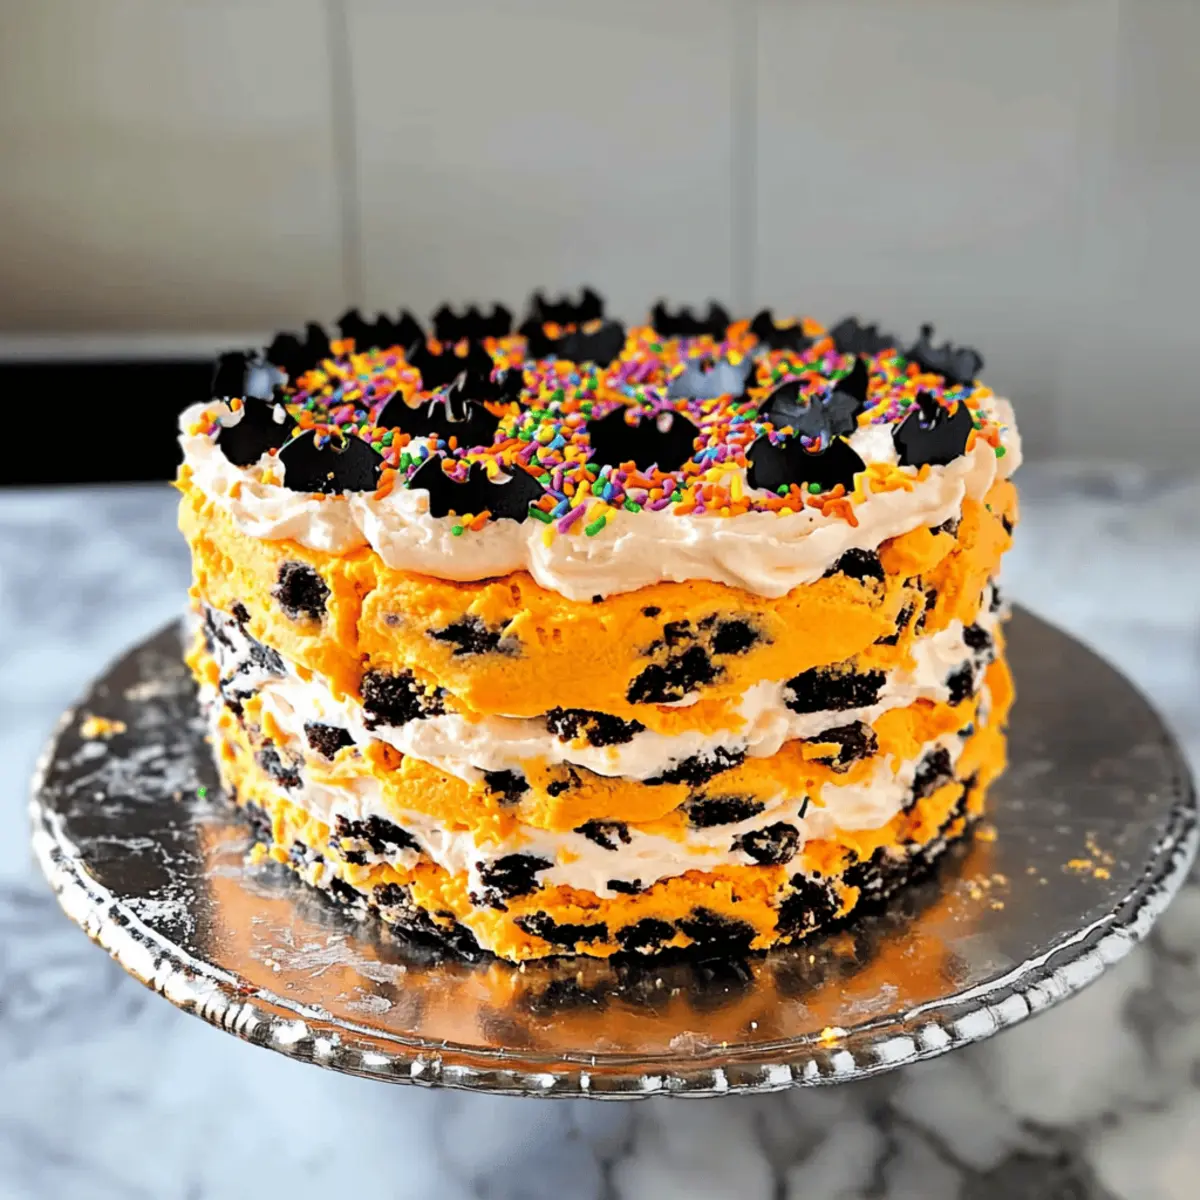
Next, divide the whipped cream equally into three separate bowls. Add a few drops of orange food coloring gel to each bowl, mixing thoroughly until you reach your desired shades of orange. This colorful whipped cream will give your Halloween Icebox Cake a festive touch that will delight both kids and adults alike.
Step 4: Layer the Cake
Start assembling your cake by placing a layer of Oreo cookies on the bottom of the prepared pan, filling in any gaps with broken cookies for a stable base. Spread one-third of the darkest colored whipped cream over the cookies using a spatula, smoothing it out evenly. Repeat this process, alternating Oreo layers and colored whipped cream, ending with a swirl of the remaining whipped cream on top for a beautiful finish.
Step 5: Chill
Cover the pan tightly with plastic wrap to prevent any odors from the refrigerator infiltrating your cake. Refrigerate the assembled Halloween Icebox Cake for at least 6 hours, or preferably overnight, to allow it to set. This chilling time is crucial for achieving the perfect firm slice that holds its shape when served.
Step 6: Decorate
Once chilled, carefully remove the cake from the refrigerator and gently take it out of the springform pan. Use a piping bag filled with orange icing to create fun designs on top of the cake, then sprinkle festive bat-shaped sprinkles over the icing for a spooky touch. This final decoration transforms your Halloween Icebox Cake into a delightful centerpiece for any Halloween celebration.
What to Serve with No-Bake Halloween Icebox Cake
Indulging in this creamy dessert is best complemented by delightful pairings that evoke the spirit of the season.
- Spooky Fruit Salad: A mix of seasonal fruits like oranges, grapes, and blackberries adds a refreshing twist while enhancing the Halloween theme.
- Cinnamon Sugar Doughnuts: These fluffy bites offer a warm, cozy texture that contrasts beautifully with the cold, creamy cake. Perfect for a seasonal treat!
- Pumpkin Spice Whipped Cream: Elevate the classic whipped cream by whisking in pumpkin spice for a festive layer that brings fall flavors to your dessert table.
- Chocolate Spider Cookies: These chewy treats can add a fun and spooky vibe alongside the icebox cake, engaging both kids and adults alike.
- Hot Pumpkin Spice Latte: The rich flavors in this drink harmonize with the cake’s texture, creating a delightful warm-and-cool experience for your palate.
- Toasted Marshmallow Milkshake: This indulgent shake, with its creamy consistency, enhances the joyful spirit of Halloween and pairs seamlessly with the rich icebox cake.
- Caramel Drizzle: Add a touch of warm caramel on top for a sweet finish that contrasts the cake’s chocolate layers—an inviting synergy of flavors.
- Bat-shaped Sugar Cookies: Decorated with royal icing for a Halloween flair, these cookies make for fun, crunchy accompaniments that delight party guests.
- Gingerbread Flavored Hot Chocolate: The spice profiles of gingerbread resonate with the season and create a cozy pairing that contrasts the cake’s sweetness.
- Apple Cider: A seasonal favorite that balances the richness of the icebox cake, a mug of warm apple cider can be the perfect sip alongside every bite.
Expert Tips for Halloween Icebox Cake
-
Chill Thoroughly: Refrigerate the cake for at least 8 hours. This ensures the layers are set properly for easy slicing and a neat presentation.
-
Color Control: For a vibrant ombre effect, experiment by adding varying amounts of food coloring to the whipped cream. This adds an artistic touch to your Halloween Icebox Cake that dazzles!
-
Slice Smoothly: Use a thin, sharp knife dipped in warm water to cut through the cake easily. This helps achieve clean edges without disturbing the beautiful layers.
-
Secure Decoration: When storing the cake, cover it well to prevent the decorations from smudging. This keeps your Halloween Icebox Cake looking festive and appetizing!
-
Cookie Alternatives: Consider using different cookies, such as chocolate chip or graham crackers, for unique flavor profiles. This flexibility allows you to customize the cake to your taste preferences!
Make Ahead Options
These No-Bake Halloween Icebox Cakes are a lifesaver for busy cooks looking to simplify their holiday preparations! You can whip up the creamy filling and layer the cookie base up to 24 hours in advance, ensuring a stress-free dessert that still delivers on taste. Simply prepare the whipped cream, layer it with the Oreo cookies, and cover the pan tightly with plastic wrap to maintain freshness in the refrigerator. When you’re ready to serve, add your favorite decorations and let it chill for at least 6 hours, or overnight for better slicing. This way, every bite is just as delicious as if it were made fresh that day!
How to Store and Freeze Halloween Icebox Cake
Fridge: Keep the Halloween Icebox Cake covered in the fridge for up to 3 days. This will maintain its freshness and creamy texture, ensuring you can enjoy each slice.
Freezer: If you want to extend its life, the cake can be frozen for up to 2 months. Wrap tightly in plastic wrap and then in foil to prevent freezer burn.
Thawing: To serve, transfer the frozen cake to the fridge the night before and let it thaw slowly. This will help retain the moisture and creamy essence of the cake.
Serving: Always slice with a warm, thin knife for clean edges, regardless of whether it’s refrigerated or frozen, to keep the festive layers intact while enjoying your delicious Halloween Icebox Cake!
Halloween Icebox Cake Variations & Substitutions
Feel free to make this delightful Halloween Icebox Cake your own with these fun and easy swaps!
-
Dairy-Free: Use coconut cream instead of heavy whipping cream for a creamy, dairy-free alternative that doesn’t compromise on flavor.
Coconut cream gives the same luscious texture while adding a subtle hint of tropical flavor—perfect for a unique twist! -
Flavor Swap: Choose almond extract instead of vanilla for a delightful nutty flavor in your whipped cream.
Almond brings a warm complexity to your cake layers, making it a memorable treat that stands out at any gathering. -
Sugar Alternative: Replace powdered sugar with maple syrup for a natural sweetener option.
Earthy and rich, maple syrup adds an irresistible depth to your cake, making every bite even more indulgent! -
Color Variations: Substitute the orange food coloring with purple or green gel coloring for a different Halloween vibe.
Get creative and alternate colors for different occasions—this cake can easily transition to themes beyond Halloween! -
Oreo Substitute: Switch out classic Oreos for gluten-free cookies to accommodate dietary restrictions.
The cake retains its delicious flavor, allowing everyone to enjoy this stunning dessert without worry! -
Add Layers: Incorporate fresh berries or chocolate pudding between the layers for extra texture and flavor.
A burst of fruitiness or rich chocolate elevates the experience and creates a beautiful visual contrast in your cake. -
Icing Options: Experiment with flavored icing, such as chocolate or caramel, in place of orange icing for a unique topping experience.
Switching up the icing enhances the cake’s character, adding a delightful surprise with each slice!
Looking for more delicious ideas? You might also enjoy the flavorful Blueberry Cream Cake or the vibrant Flourless Orange Cake!
Halloween Icebox Cake Recipe FAQs
How do I select ripe ingredients for my Halloween Icebox Cake?
Absolutely! For the best results, ensure your heavy whipping cream is fresh and within the expiration date for the creamiest texture. When it comes to food coloring, opt for gel food coloring which gives vibrant hues with just a small amount. If you’re substituting and want fruits, make sure any additions are ripe and ready to use, which enhances both flavors and presentation.
How should I store the Halloween Icebox Cake?
Very well! Cover the icebox cake securely with plastic wrap and keep it in the refrigerator for up to 3 days. This ensures that the cream stays fresh and maintains its delightful texture. If you need it to last longer, you can freeze it for up to 2 months—just make sure to wrap it tightly in plastic wrap followed by aluminum foil to prevent freezer burn.
Can I freeze my Halloween Icebox Cake? If so, how?
Yes, you can! To freeze the Halloween Icebox Cake, start by wrapping it tightly in plastic wrap followed by a layer of aluminum foil. This double wrapping prevents freezer burn and preserves the cake’s creaminess. When you’re ready to enjoy it, simply place it in the refrigerator the night before you plan to serve it. This slow thawing method will help maintain its texture and flavor.
What should I do if my whipped cream isn’t whipping up?
Don’t worry; this happens to the best of us! If your whipped cream isn’t reaching stiff peaks, there are a couple of troubleshooting steps to try. Ensure that your heavy cream is extremely cold—chill your mixing bowl and beaters in the freezer for a few minutes before whipping. Additionally, check the fat content; heavy cream should have at least 36% fat for optimal whipping. If it’s still not working, you might need to whip a bit longer or start over with fresh cream.
Are there any dietary considerations for the Halloween Icebox Cake?
Yes! For those with dairy allergies, you can substitute the heavy whipping cream with coconut cream, which gives a rich, creamy consistency while being dairy-free. Also, if gluten is a concern, using gluten-free Oreo cookies is a great alternative. Always check labels for any other allergens if sharing with guests, ensuring everyone can enjoy the festive treat!
How can I prevent the decorations from smudging?
To keep your Halloween Icebox Cake looking as festive as possible, make sure to cover it gently but thoroughly when refrigerating. Avoid touching the decorations directly; instead, use a toothpick or clean utensil for adjustments. When serving, slice the cake carefully with a thin, warm knife to avoid disturbing the decorations on top. This way, your spooky design stays intact while you delight in each slice!
Delicious No-Bake Halloween Icebox Cake to Impress Your Guests
Ingredients
Equipment
Method
- Begin by lining a 9-inch springform pan with plastic wrap or parchment paper, ensuring it extends up the sides.
- In a large mixing bowl, pour the heavy whipping cream and add the vanilla extract and powdered sugar, then whisk until stiff peaks form.
- Divide the whipped cream into three bowls and add orange food coloring gel to each, mixing until desired shades are reached.
- Assemble the cake by placing a layer of Oreo cookies on the bottom, spreading one-third of the darkest colored whipped cream, then repeat layers.
- Cover the pan tightly with plastic wrap and refrigerate for at least 6 hours or overnight.
- Carefully remove the cake from the fridge, take it out of the springform pan, and decorate with orange icing and bat-shaped sprinkles.
Leave a Reply