
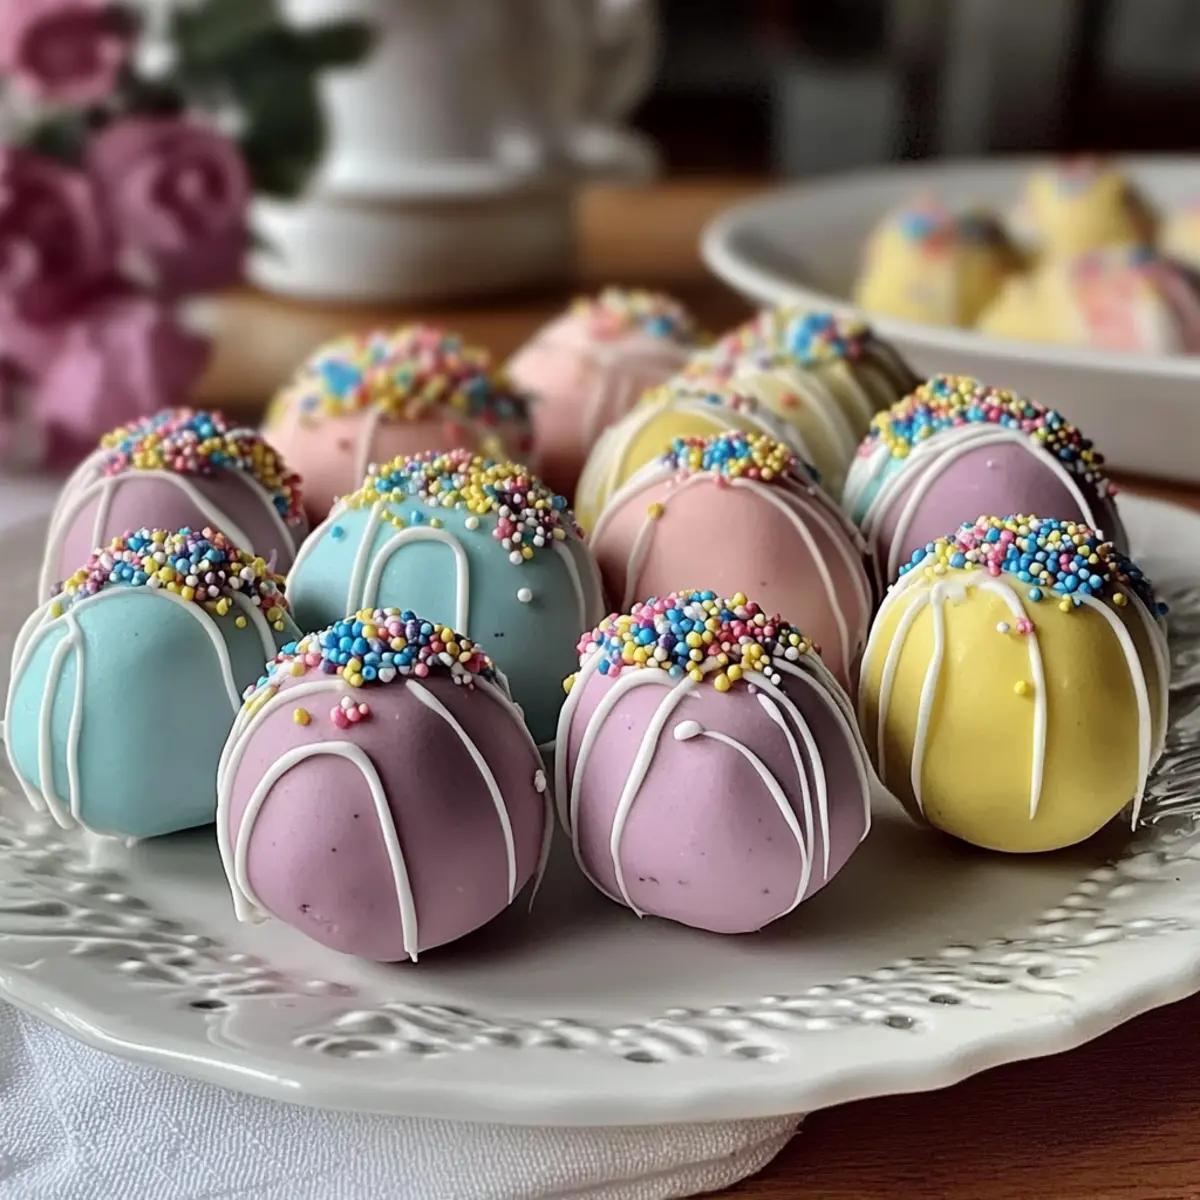
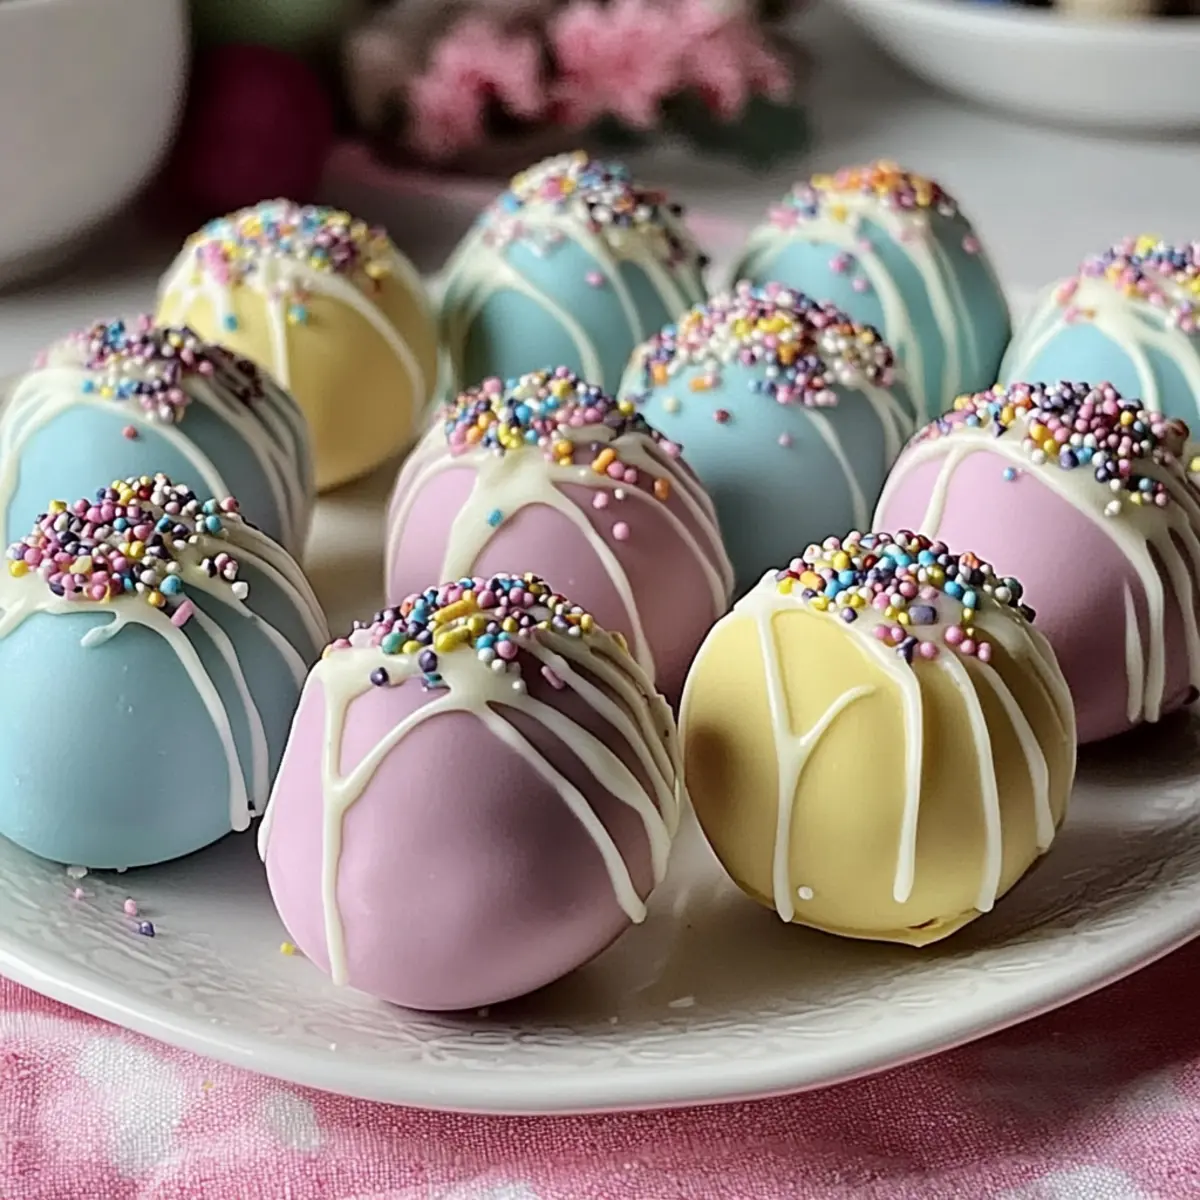
Spring is in the air, and with it comes the joyful hustle of preparing festive treats to celebrate the season. Picture the delight on everyone’s faces as I unveil a platter of Easter Egg Oreo Balls—charming, colorful, and completely no-bake! These sweet bites are not only a breeze to whip up, making them perfect for last-minute gatherings, but they also offer a deliciously creamy center that captures the beloved cookies-and-cream flavor we all adore. These Easter treats are an absolute crowd-pleaser, with their vibrant pastel coatings adding an extra touch of cheer. So, are you ready to dive into a fun and simple dessert that will make your spring celebrations unforgettable? Let’s get started!
Why Are Easter Egg Oreo Balls So Fun?
Easy to Make: With no baking required, you can whip these up in no time, making them an ideal choice for last-minute gatherings.
Creamy Delight: The combination of rich cream cheese and Oreo cookies creates a mouthwatering filling that’s sure to satisfy every sweet tooth.
Festive Appeal: Their colorful pastel coatings not only look beautiful but also evoke that fun Easter spirit, making your dessert table pop.
Perfect for Sharing: These delightful treats are easy to make in bulk, perfect for parties, classroom celebrations, or family get-togethers.
Endless Creativity: Feel free to personalize your Easter Egg Oreo Balls with different colors or sprinkles, allowing them to reflect your unique style.
If you enjoy simple and delicious treats, check out my Cozy Chicken Veggies for your next meal!
Easter Egg Oreo Balls Ingredients
Get ready to make the sweetest, no-bake treats around!
For the Filling
- Oreo Cookies – These cookies provide a rich base flavor and texture; be sure to use the whole cookie, cream included.
- Cream Cheese – Softened cream cheese binds the mixture and gives a wonderfully creamy texture; make sure it’s at room temperature for easy mixing.
- Vanilla Extract (optional) – This enhances the overall flavor; feel free to omit it if you don’t have any on hand.
For the Coating
- Candy Melts or White Chocolate Chips – These create a delightful outer shell; candy melts provide a smoother coating, but white chocolate can be used with a splash of coconut oil for easier melting.
- Pastel Food Coloring – Choose soft colors that match the vibrant Easter theme for your coating.
For Decoration
- Sprinkles or Sanding Sugar (optional) – These add a fun and festive touch; feel free to get creative with your choice of colors!
With these ingredients on hand, you’ll be all set to make your delicious Easter Egg Oreo Balls. These delightful treats are sure to impress family and friends at your next gathering!
Step‑by‑Step Instructions for Easter Egg Oreo Balls
Step 1: Prepare the Oreo Crumbs
Begin by placing the Oreo cookies into a food processor and pulse until they transform into fine crumbs. This step is crucial for a smooth filling, so ensure there are no large chunks remaining. If you don’t have a food processor, you can also place the cookies in a resealable bag and crush them with a rolling pin until finely ground.
Step 2: Mix the Filling
In a large mixing bowl, combine the Oreo crumbs with softened cream cheese and, if desired, a splash of vanilla extract. Using a spatula or your hands, blend the ingredients until a thick, dough-like consistency forms. The mixture should feel moist and hold together without crumbling. This rich filling is what makes Easter Egg Oreo Balls such a delightful treat.
Step 3: Shape the Easter Eggs
Scoop about one tablespoon of the Oreo mixture and roll it into an egg shape using your hands. It’s helpful to wet your hands slightly to prevent sticking. Place each shaped egg onto a parchment-lined baking tray, ensuring they have some space between them for easy dipping later. The goal is to create a uniform shape that resembles traditional Easter eggs.
Step 4: Chill the Eggs
Once all your eggs are shaped, pop them into the refrigerator and chill for about 30 minutes. This step is vital as it allows the filling to firm up, making it easier to dip them into the coating without losing their shape. You’ll know they’re ready when they feel solid to the touch.
Step 5: Melt the Candy Coating
While your Easter eggs are chilling, prepare the candy coating. In a microwave-safe bowl, heat the candy melts or white chocolate chips in short bursts of 30 seconds, stirring in between until smooth. Be cautious not to overheat to avoid scorching. The melted coating should be glossy and fluid for easy dipping.
Step 6: Color the Chocolate
If you’d like vibrant pastel colors, divide the melted coating into separate bowls and add a few drops of pastel food coloring to each, mixing until you achieve your desired shades. This step unleashes your creativity, so feel free to have fun with the colors as you prepare to coat your Easter Egg Oreo Balls.
Step 7: Dip the Eggs
Once your eggs are chilled and the coating is ready, it’s time to dip! Carefully submerge each chilled egg into the melted coating, ensuring it is fully covered. Allow any excess coating to drip off before placing them back on the parchment-lined tray. This step gives your Easter Egg Oreo Balls their beautiful, glossy finish.
Step 8: Decorate
While the coating is still wet, sprinkle your choice of festive sprinkles or sanding sugar on top of the eggs to add a lovely decorative touch. You can also drizzle additional melted chocolate in contrasting colors for an extra special finish. This step enhances the visual appeal, making your Easter treats truly festive.
Step 9: Set the Coating
Allow the dipped eggs to sit at room temperature until the coating firms up, which should take about 15 minutes. If you’re in a hurry, you can also place them in the refrigerator for a short time to speed up the setting process. You’ll know they’re ready when the coating feels firm to the touch.
Step 10: Serve
Once fully set, arrange your beautifully decorated Easter Egg Oreo Balls on a platter. They’re now ready to be served at your next gathering or celebration. With their colorful appearance and irresistible creamy filling, these no-bake treats will surely delight everyone who indulges in them!
Easter Egg Oreo Balls Variations
Feel free to mix and match these ideas to make your Easter Egg Oreo Balls uniquely yours!
-
Graham Cracker Base: Substitute crushed Graham crackers for the Oreo crust for a different, subtly sweet flavor. This twist adds a delightful crunch!
-
Chocolate Coating: Use dark or milk chocolate instead of candy melts for a decadent variation that offers a richer taste.
-
Nutty Addition: Fold in chopped nuts or crushed nuts into the filling for added texture and a delightful crunch in every bite. For nut lovers, this variation is a game changer!
-
Flavored Extracts: Experiment with almond or mint extract to give your treats a unique twist that surprises the palate. Just remember to start with a small amount, as these flavors can be potent!
-
Coconut Infusion: Mix shredded coconut into the filling for a tropical twist that pairs surprisingly well with chocolate. This addition brings a bit of sunshine to your Easter festivities!
-
Spiced Flavor: Add a dash of cinnamon or nutmeg to the filling for a warm, cozy undertone that complements the sweetness beautifully.
-
Fruit Fillings: Fold in crushed freeze-dried strawberries or raspberries into the filling for a fruity surprise that pairs perfectly with the creaminess!
-
Cheesecake Twist: Swap the cream cheese for flavored cream cheese, like strawberry or raspberry, for an extra layer of flavor and richness.
These ideas can elevate the classic Easter Egg Oreo Balls even further! If you’re looking for delightful meal options to pair with your treats, check out my Cozy Chicken Veggies for a balanced spread everyone will love!
Expert Tips for Easter Egg Oreo Balls
-
Fine Crumbs: Ensure your Oreo cookies are finely crushed for a smooth filling; large chunks can lead to a textured mixture that’s hard to shape.
-
Chill Thoroughly: Keep the shaped eggs in the fridge long enough so they firm up well; this helps maintain their shape during the dipping process.
-
Controlled Melting: Melt the candy coating in short bursts to prevent scorching; stir frequently to achieve a smooth, glossy finish—this is key for perfect Easter Egg Oreo Balls.
-
Use Coconut Oil: A small splash of coconut oil in your white chocolate will help the coating spread smoothly and give that glossy appearance.
-
Working in Batches: Dip in small batches and keep uncoated eggs chilled to make the process easier and ensure even coating for all your treats.
How to Store and Freeze Easter Egg Oreo Balls
Fridge: Store your Easter Egg Oreo Balls in an airtight container, where they will remain fresh for up to 1 week. Keep them chilled to maintain their creamy texture and flavor.
Freezer: Freeze the shaped eggs before coating for up to 3 months. Once coated, they can be stored in the freezer for about 2 months; just ensure they are well-wrapped to avoid freezer burn.
Thawing: When you’re ready to enjoy, thaw the frozen Oreo balls in the fridge for several hours or overnight before serving. This preserves their flavor and texture beautifully.
Make-Ahead: These treats can be made 1-2 days in advance, which makes them perfect for busy spring occasions or festive gatherings.
Make Ahead Options
These Easter Egg Oreo Balls are perfect for meal prep enthusiasts! You can prepare the filling and shape the eggs up to 24 hours in advance, ensuring they are chilled and firm before coating. Simply follow the steps to mix the Oreo crumbs and cream cheese, then roll them into egg shapes and refrigerate. For the coating, melt the candy melts or white chocolate the day you plan to serve them to maintain that glossy finish and ensure they look fresh. Once dipped and decorated, the balls can be stored in an airtight container in the refrigerator for up to 3 days, remaining just as delicious!
What to Serve with Easter Egg Oreo Balls?
Springtime delights deserve a full feast to celebrate, and pairing these charming treats can elevate your gathering.
- Fruity Salad: A vibrant mixed fruit salad brings freshness and a burst of flavor to balance the rich sweetness of the Oreo balls.
- Vanilla Ice Cream: Creamy vanilla ice cream is a delightful complementary dessert that adds a cool contrast to the richness of the truffles.
- Cupcakes: Light and fluffy vanilla or lemon cupcakes provide a delightful texture and flavor contrast, perfect for an Easter brunch.
- Chocolate-Covered Strawberries: These offer a fresh, fruity addition that echoes the sweet chocolate of the Oreo balls while adding a burst of color.
- Sparkling Lemonade: A refreshing, fizzy drink that brightens up your dessert table, its zesty notes cut through the sweetness effectively.
- Creamy Dip: Pair with a light yogurt-based dip for fresh fruits; this creamy contrast enhances the experience of your sweets.
With these pairing ideas, you’ll craft a well-rounded spring celebration that radiates joy and flavor!

Easter Egg Oreo Balls Recipe FAQs
How do I choose the right Oreos for this recipe?
Absolutely! It’s best to use regular Oreo cookies for this recipe to achieve the signature cookies-and-cream flavor. Any other cookie will alter the taste and texture. Make sure to include the cream filling as it contributes to the rich filling.
How long can I store these Oreo balls in the fridge?
Your Easter Egg Oreo Balls can be stored in an airtight container in the fridge for up to 1 week. Make sure to keep them chilled to maintain their creamy texture and delicious flavor. They vanish quickly, so you might want to double the batch!
Can I freeze the Easter Egg Oreo Balls?
Absolutely! You can freeze the shaped eggs before coating for up to 3 months. If you’ve already dipped them, they’ll keep in the freezer for about 2 months. Just wrap them well to prevent freezer burn. When you’re ready to indulge, thaw them in the refrigerator for several hours or overnight for the best texture and flavor.
What if my mixture is too crumbly?
Very! If your Oreo mixture feels too crumbly and doesn’t hold together when forming shapes, you likely need more cream cheese. Try adding an extra tablespoon of softened cream cheese and mix until you reach a thick, moldable consistency. This will help bind your ingredients and make shaping the Easter eggs easier.
Can I make these treats in advance for a party?
Absolutely! These treats can be made 1-2 days ahead of time, making them perfect for busy spring occasions or celebrations. Just store them in an airtight container in the refrigerator until you’re ready to serve. They’ll stay fresh and tasty for your guests to enjoy!
Are there any substitutions for cream cheese for those with allergies?
Very! If you’re looking for a dairy-free option, you can use a dairy-free cream cheese alternative, which works similarly in this recipe. Just ensure it is softened to mix easily with the Oreo crumbs. You could also try cashew cream or a homemade coconut cream for a deliciously whipped filling—make sure it’s thick enough to hold its shape!

Easter Egg Oreo Balls: Effortlessly Charming No-Bake Treats
Ingredients
Equipment
Method
- Prepare the Oreo Crumbs: Place the Oreo cookies into a food processor and pulse until fine crumbs.
- Mix the Filling: Combine Oreo crumbs with softened cream cheese and vanilla extract in a mixing bowl.
- Shape the Easter Eggs: Scoop about one tablespoon of the mixture and roll it into an egg shape.
- Chill the Eggs: Refrigerate for about 30 minutes to firm up.
- Melt the Candy Coating: Heat candy melts or white chocolate chips in a microwave-safe bowl.
- Color the Chocolate: Divide melted coating into bowls and add pastel food coloring.
- Dip the Eggs: Submerge each egg in the melted coating until fully covered.
- Decorate: While coating is wet, sprinkle with your choice of sprinkles.
- Set the Coating: Allow eggs to sit until the coating firms up.
- Serve: Arrange your Easter Egg Oreo Balls on a platter and enjoy!
Leave a Reply