
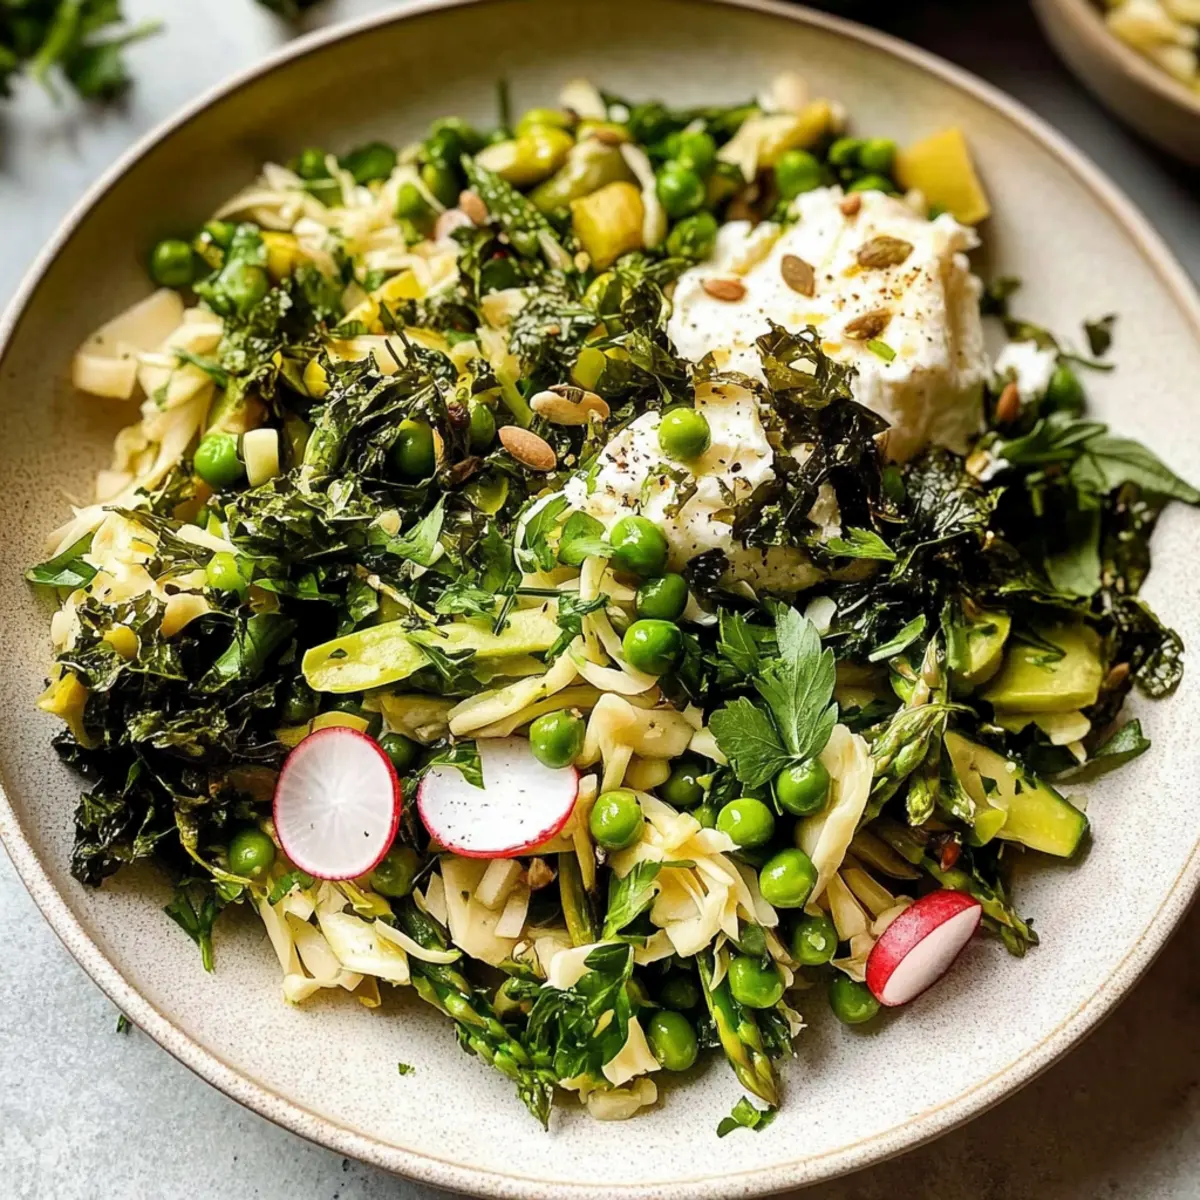
With a sprinkle of sunshine and a dash of freshness, spring is the perfect season to shake up your salad routine. As the earth bursts into life, I find myself drawn to vibrant, colorful dishes that celebrate the season’s bounty. Among my favorites is the Spring Orzo Salad, a delightful blend of tender orzo pasta, crisp vegetables, and creamy bursts of flavor that make it an irresistible choice. You’ll love how it’s not only quick to prepare but can also be a hearty centerpiece or a refreshing side for any meal. Perfect for those sunny afternoons or a light dinner, this salad captures the essence of spring in every bite. So, what delicious ingredients will you choose to bring this dish to life?

Why is Spring Orzo Salad a Must-Try?
Vibrant Flavors: The combination of fresh vegetables and creamy orzo makes each bite a burst of springtime goodness.
Quick and Easy: With minimal prep time, you can whip up this salad in a flash, making it perfect for busy weeknights or spontaneous picnics.
Versatile Dish: Whether served as a light main course or a side dish at a gathering, it fits perfectly on any table. You might also enjoy pairing it with a refreshing Buffalo Chicken Salad for a complete meal.
Nutrient-Rich: Packed with protein, fiber, and seasonal veggies, it’s a wholesome choice that aligns with health-conscious eating.
Customizable: Feel free to swap in your favorite ingredients—from grilled chicken to extra herbs—ensuring each experience is unique. Why not try it with some luscious burrata for extra creaminess?
Spring Orzo Salad Ingredients
For the Salad
- Orzo Pasta – A small, rice-shaped pasta that gives a delightful, chewy texture; whole wheat or gluten-free options are great substitutions.
- Cucumbers – Adds a refreshing crunch; try substituting with zucchini for a different taste.
- Cherry Tomatoes – Sweet bursts of flavor; can be replaced with diced bell peppers if preferred.
- Radishes – Contributes a peppery kick and vibrant color; swap with sliced green onions for a milder bite.
- Bell Peppers – Brings sweetness and crunch; choose various colors for visual appeal!
- Fresh Herbs (Basil, Parsley, Dill) – Enhances flavor and freshness; mix and match or use dried herbs when fresh isn’t on hand.
- Feta Cheese – Creamy and tangy, perfect for flavor; substitute with goat cheese for a different creaminess.
- Pistachios – For a delightful crunch and nutty flavor; sunflower seeds can be an alternative for nut-free options.
For the Dressing
- Lemon Juice – Brightens up the salad with a zesty kick; apple cider vinegar can serve as a nice alternative.
- Olive Oil – Provides healthy fats and richness; swap with avocado oil for a different flavor.
- Honey – A touch of sweetness to balance the acidity; maple syrup works well for a plant-based option.
- Dijon Mustard – Adds depth and a little tang; you could use balsamic vinegar for a sweeter dressing.
Enjoy creating your Spring Orzo Salad with these fresh ingredients, and don’t forget to let each flavor shine through!
Step‑by‑Step Instructions for Spring Orzo Salad
Step 1: Prepare the Orzo
Start by bringing a large pot of salted water to a boil over high heat. Add 1 cup of orzo pasta and cook according to package directions, typically around 8-10 minutes, until al dente. Once cooked, drain the orzo in a colander, and rinse it under cold water for about 30 seconds to stop the cooking process and cool it down.
Step 2: Chop the Vegetables
While the orzo cools, wash and chop your choice of vegetables. Dice 1 cucumber, halve 1 cup of cherry tomatoes, and thinly slice a handful of radishes and bell peppers. Aim for vibrant colors and varied textures to enhance the Spring Orzo Salad. Set aside the chopped vegetables in a large mixing bowl.
Step 3: Mix in Fresh Herbs
Next, take a generous handful of fresh herbs, like basil, parsley, and dill. Roughly chop the herbs and add them to your bowl of vegetables. These fresh ingredients will bring a burst of flavor and fragrance to your Spring Orzo Salad, inviting the essence of spring to come alive in each bite.
Step 4: Prepare the Dressing
In a small bowl, whisk together the dressing ingredients. Combine the juice of 1 lemon, 3 tablespoons of olive oil, 1 tablespoon of honey, and 1 teaspoon of Dijon mustard. Blend until smooth and well combined, creating a zesty and slightly sweet dressing that will perfectly complement the orzo and vegetables.
Step 5: Combine Everything Together
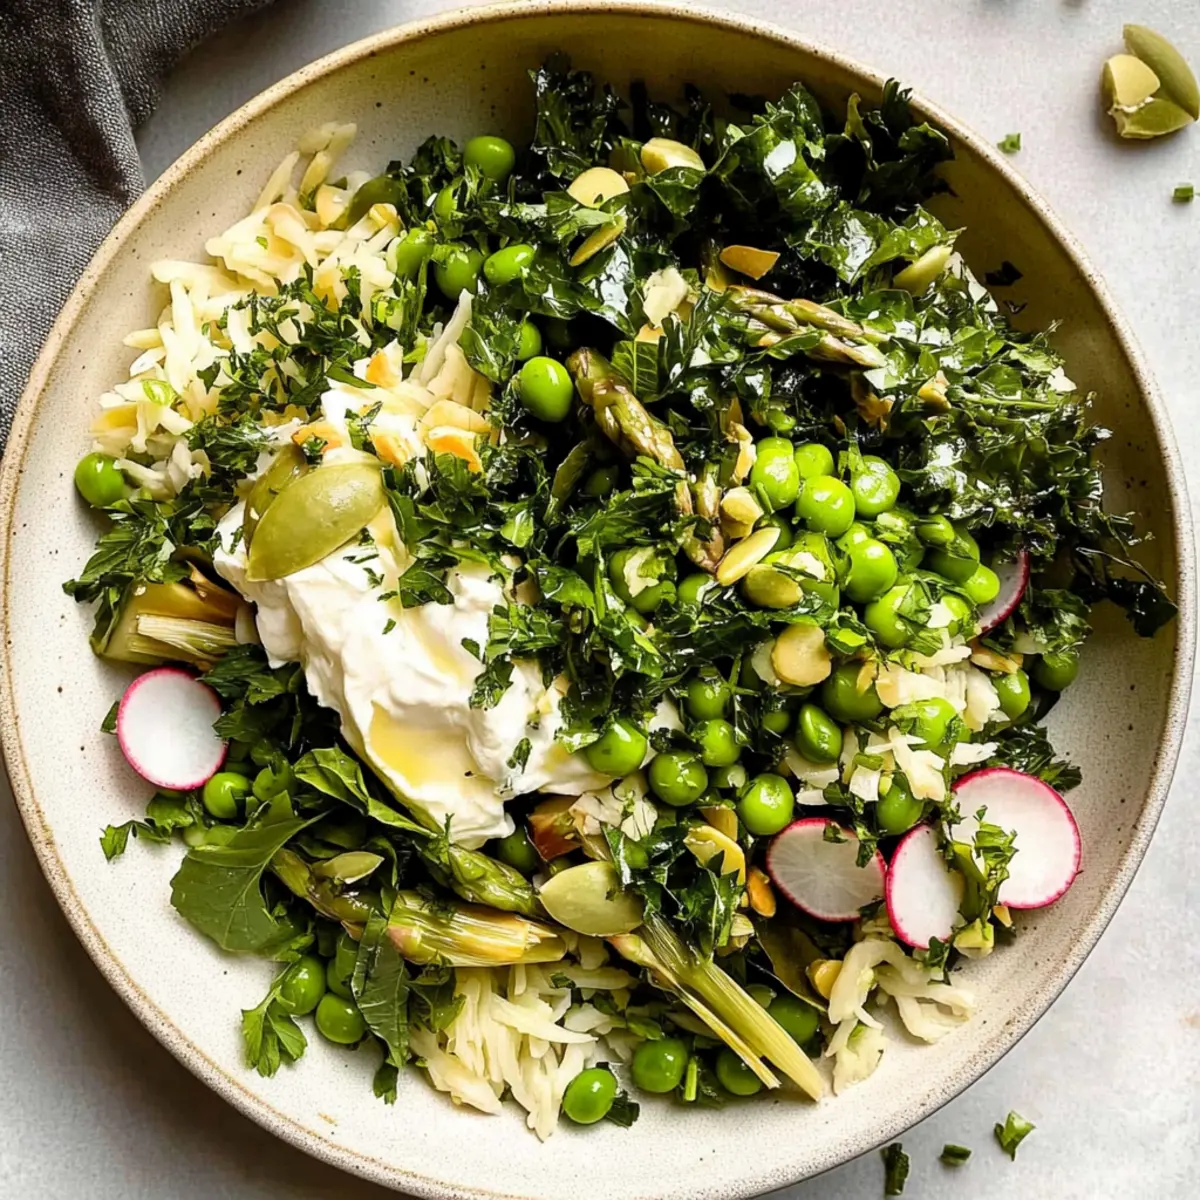
Once the orzo has cooled, add it to the bowl filled with vegetables and herbs. Drizzle your freshly prepared dressing over the top, then gently toss everything together using tongs or a large spoon. Aim for an even distribution of all ingredients, ensuring each element of your Spring Orzo Salad shines.
Step 6: Add the Finishing Touches
To elevate your salad, crumble about ½ cup of feta cheese over the top and sprinkle a handful of pistachios for a delightful crunch. Gently toss again, allowing the creamy cheese to meld with the bright flavors of the salad. Your Spring Orzo Salad is now dressed to impress and ready to serve.
Step 7: Serve and Enjoy
Transfer your colorful Spring Orzo Salad to a large serving platter or individual bowls. If desired, let it sit for about 10 minutes for the flavors to meld harmoniously. Enjoy this fresh and vibrant salad as a centerpiece for your meal or a bright side dish that brings spring to your table.
Make Ahead Options
These Spring Orzo Salads are truly a lifesaver for busy home cooks looking to save time! You can prep the vegetables, herbs, and even the orzo pasta up to 24 hours in advance. Simply chop your cucumbers, cherry tomatoes, and radishes, and store them in an airtight container in the refrigerator to keep them crisp. Prepare the dressing and refrigerate it separately for the best flavor. When you’re ready to serve, combine the chilled orzo, vegetables, and dressing together, adding the feta cheese and pistachios just before you dig in. This way, your Spring Orzo Salad remains fresh and delightful, ensuring you enjoy all the vibrant flavors even on those hectic weeknights!
Spring Orzo Salad Variations & Substitutions
Feel free to get creative and customize your Spring Orzo Salad with these delightful twists!
- Vegan Delight: Replace feta with avocado for creaminess and keep it plant-based while adding healthy fats.
- Protein Boost: Swap orzo for chickpeas or lentils to enhance the protein kick and make each bite heartier.
- Nut-Free Crunch: Instead of pistachios, toss in sunflower seeds for a delightful crunch without any nuts. They add a lovely texture, too!
- Seasonal Swap: Use asparagus or peas in place of cucumbers for a touch of extra spring freshness. This can elevate the flavor profile and add color.
- Cheese Twist: Try using goat cheese instead of feta for a tangy twist that still offers creaminess, bringing a unique flavor to the salad.
- Dressing Adventure: Experiment with a lemon-tahini dressing instead of the classic olive oil and honey blend for a nutty, rich taste. It’s a fun change-up!
- Herb Infusion: Swap basil and dill for mint or cilantro for an unexpected pop of flavor, transforming your salad’s character.
- Heat Element: Add red pepper flakes or sliced jalapeños for a subtle kick that brings warmth to the bright flavors.
Why not serve your vibrant salad alongside a Grilled Chicken Salad for a delicious combo? Each variation can bring your Spring Orzo Salad to new heights while keeping the spirit of spring alive!
Storage Tips for Spring Orzo Salad
Fridge: Store your Spring Orzo Salad in an airtight container for up to 2 days to maintain freshness.
Dressing: Keep the dressing separate in a small jar; this prevents the ingredients from getting soggy and helps keep flavors vibrant.
Reheating: While best enjoyed cold, if you prefer it warm, gently reheat in the microwave for a few seconds, adding a splash of olive oil to retain moisture.
Texture Maintenance: For optimal texture, avoid mixing elements until just before serving, ensuring each bite remains crisp and delightful!
Expert Tips for Spring Orzo Salad
• Fresh Ingredients: Use the freshest seasonal vegetables for the best flavor and crispness in your Spring Orzo Salad.
• Cooking Orzo: Be careful not to overcook the orzo; it should be al dente for the right texture.
• Flavor Balance: Taste and adjust your dressing before mixing; adding more honey or lemon can create the perfect balance.
• Texture Variety: Incorporate a mix of crunchy and creamy elements like pistachios and feta to enhance the overall experience.
• Chill Time: Allow the salad to sit for at least 10 minutes after mixing; this helps the flavors meld beautifully.
What to Serve with Spring Orzo Salad?
Creating the perfect meal to accompany your vibrant Spring Orzo Salad can elevate your dining experience to new heights.
-
Grilled Lemon Chicken: Juicy and zesty, this protein pairs beautifully with the fresh flavors of your salad, making for a well-rounded meal.
-
Stuffed Bell Peppers: Tender bell peppers filled with rice and herbs add a satisfying depth that complements the springtime ingredients of your salad.
-
Honey-Glazed Carrots: Sweet caramelized carrots enhance the salad’s freshness and introduce a lovely bit of earthy sweetness to your table.
-
Simple Garlic Bread: Crunchy and buttery, this classic addition allows you to savor each delightful bite of your orzo salad, enhancing the overall experience.
-
Crisp White Wine: A chilled Sauvignon Blanc or Pinot Grigio brings a refreshing touch that pairs excellently with the salad’s bright flavors and light texture.
-
Fruit Sorbet: Ending your meal with a chilled scoop of fruity sorbet provides a refreshing, sweet contrast to the savory orzo, wrapping up your lunch or dinner perfectly.
-
Mediterranean Chickpea Salad: This protein-rich side offers additional textures and flavors, ensuring a delightful and fulfilling meal transition from salad to accompaniment.
Spring Orzo Salad Recipe FAQs
What type of orzo should I use for the Spring Orzo Salad?
Absolutely, I recommend using regular or whole wheat orzo for a heartier option. If you need a gluten-free alternative, look for gluten-free orzo made from rice or quinoa. It’s all about what fits best for your dietary needs!
How should I store leftover Spring Orzo Salad?
Store your Spring Orzo Salad in an airtight container in the refrigerator for up to 2 days. I often keep the dressing in a separate jar to prevent the salad from becoming soggy, ensuring it stays crisp and fresh.
Is it okay to freeze Spring Orzo Salad?
I don’t recommend freezing this salad because the fresh vegetables and herbs can lose their texture and quality when thawed. It’s best enjoyed fresh, but if you do have leftovers, consume them within the storage timeframe mentioned!
How can I adjust the flavors if the dressing is too tangy?
If your dressing turns out too tangy, add more honey or a dash of olive oil to balance the flavors. Taste as you go! The sweetness will help mellow out the acidity, making it just right for your palate.
Can I add extra protein to the Spring Orzo Salad?
Very! You can definitely boost the protein by adding grilled chicken, cooked chickpeas, or even some crumbled feta if you enjoy that. Each addition will provide unique flavors, and as I always say, the more the merrier!
What if I have allergies to certain ingredients?
Feel free to customize your Spring Orzo Salad to accommodate any allergies! For instance, if you’re allergic to nuts, skip the pistachios and consider seeds like sunflower or pumpkin for crunch. Always prioritize your health and adapt the recipe as needed!

Bright and Fresh Spring Orzo Salad for a Delightful Bite
Ingredients
Equipment
Method
- Start by bringing a large pot of salted water to a boil. Add orzo and cook for 8-10 minutes until al dente. Drain and rinse under cold water.
- While the orzo cools, wash and chop your vegetables. Set aside in a large mixing bowl.
- Roughly chop fresh herbs and add them to the bowl of vegetables.
- In a small bowl, whisk together the dressing ingredients until smooth.
- Once the orzo has cooled, combine it with the bowl of vegetables. Drizzle with dressing and toss gently to combine.
- Crumble feta cheese and sprinkle pistachios over the salad. Toss again gently.
- Transfer to a serving platter or individual bowls. Let sit for 10 minutes before serving.
Leave a Reply