
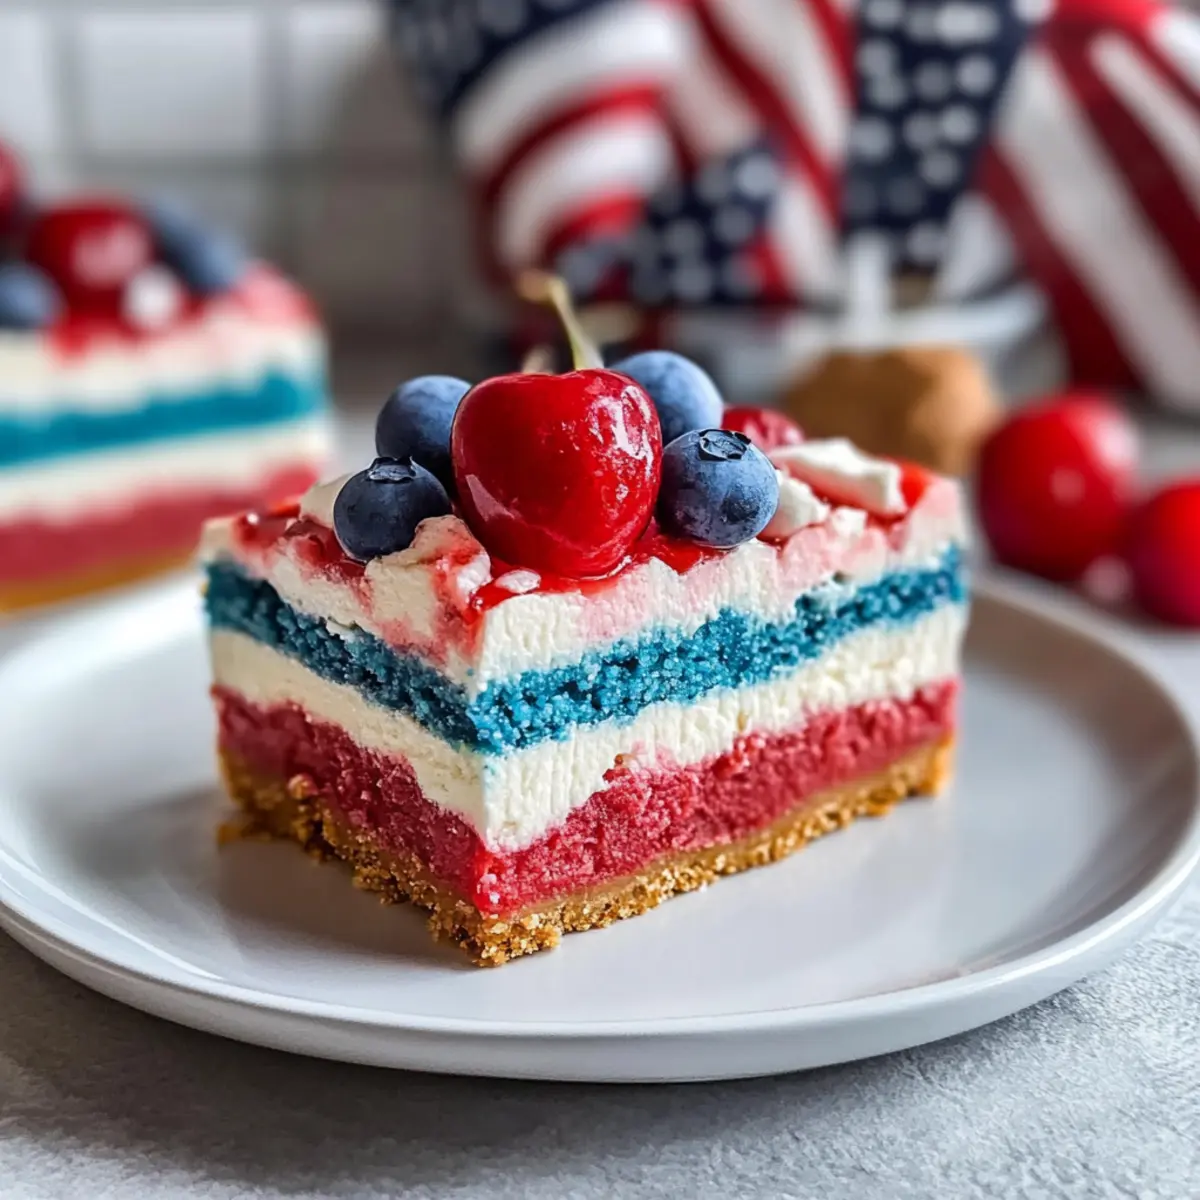
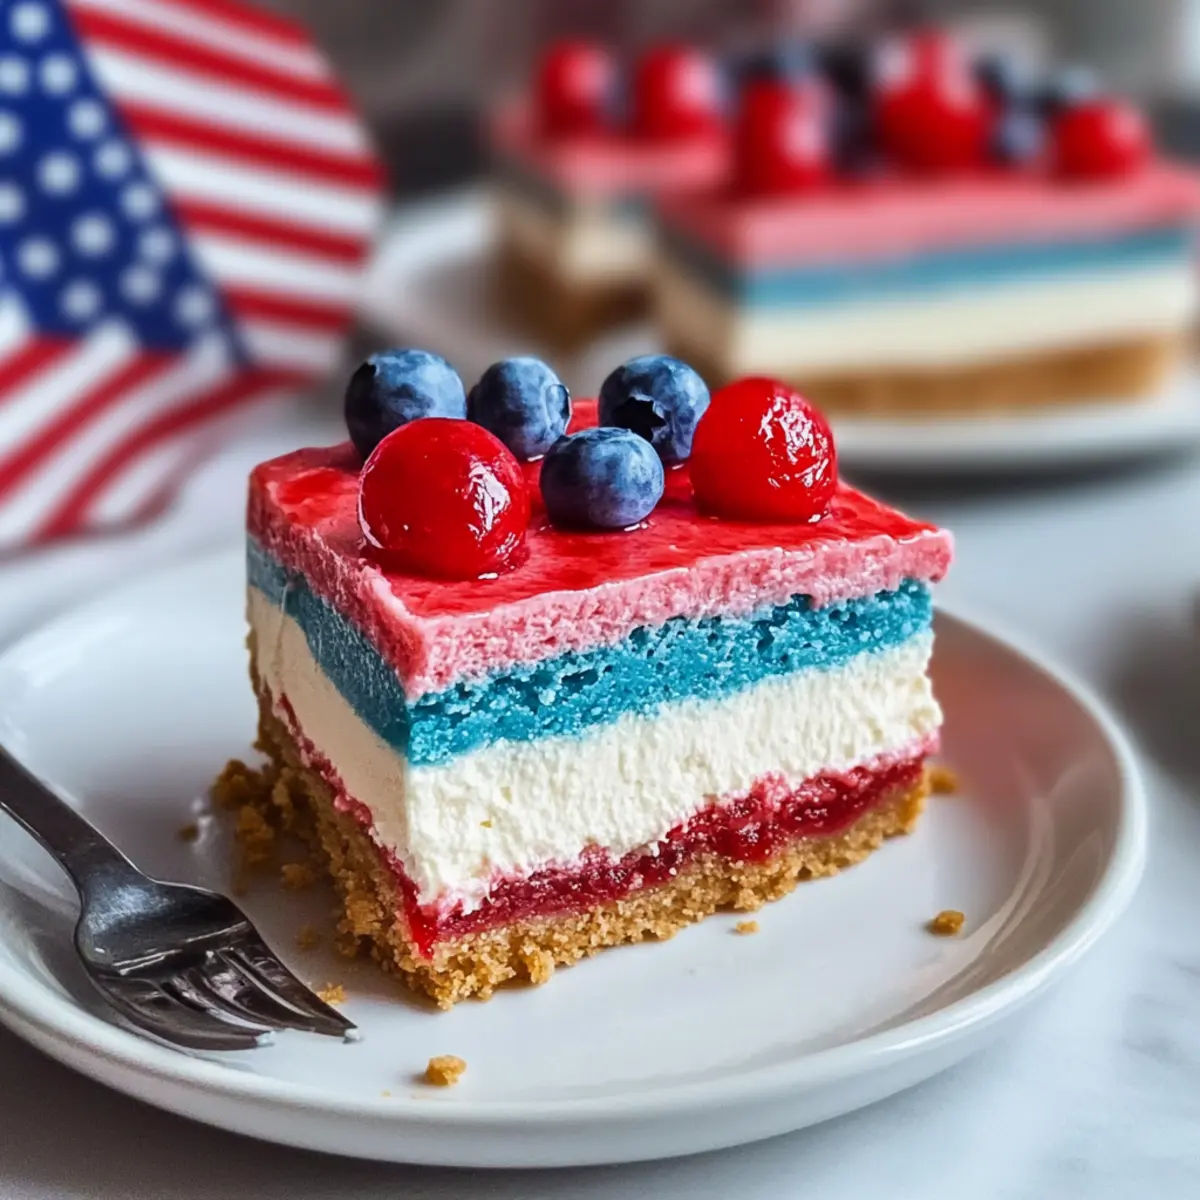
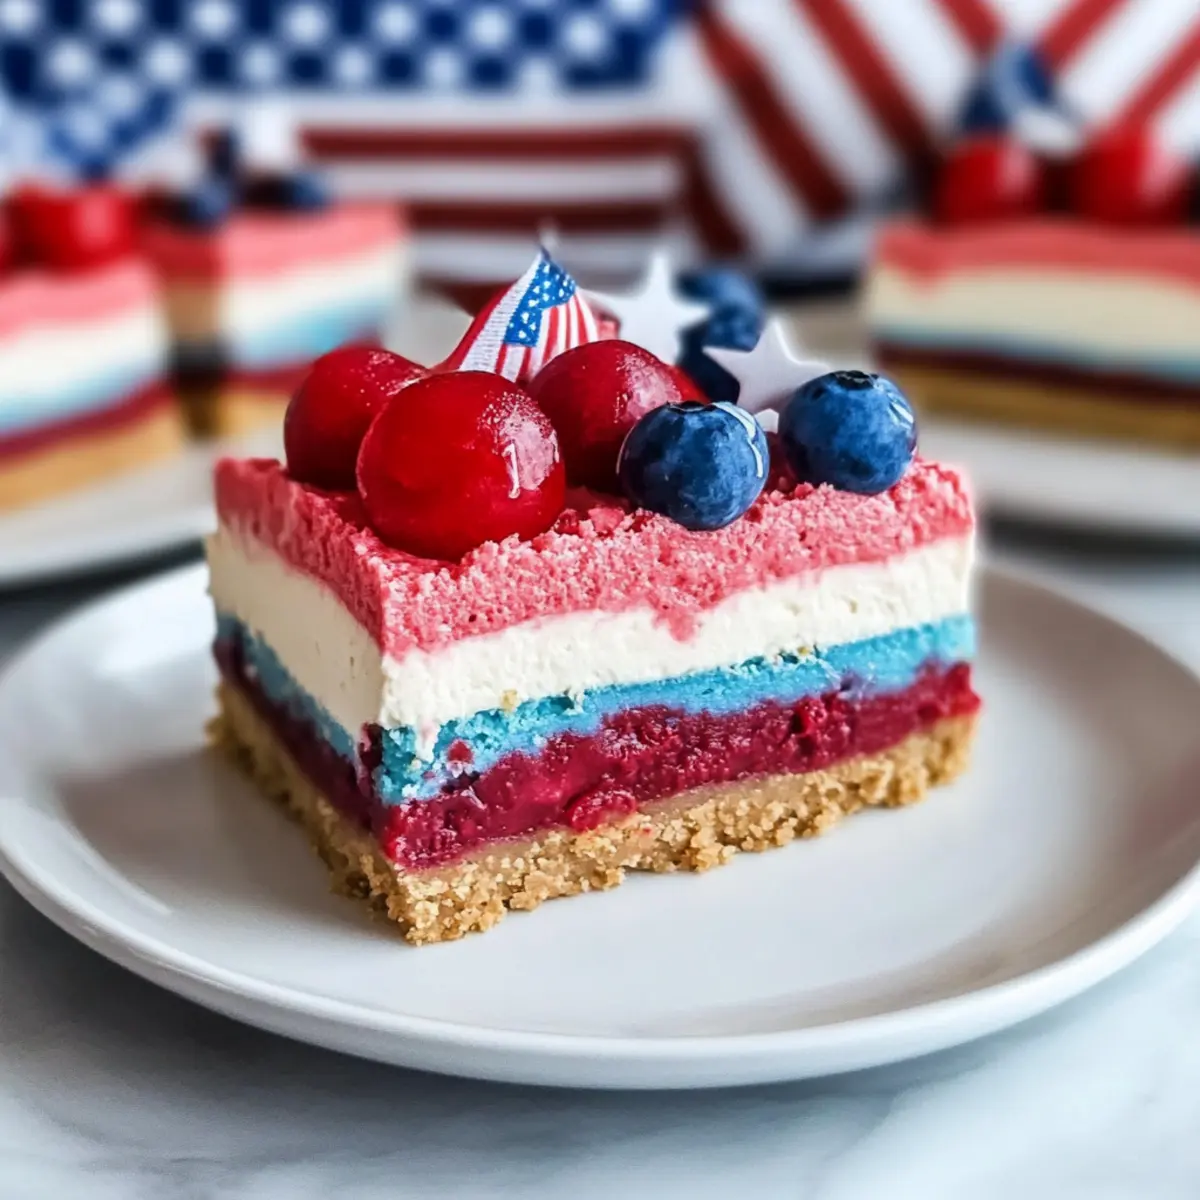
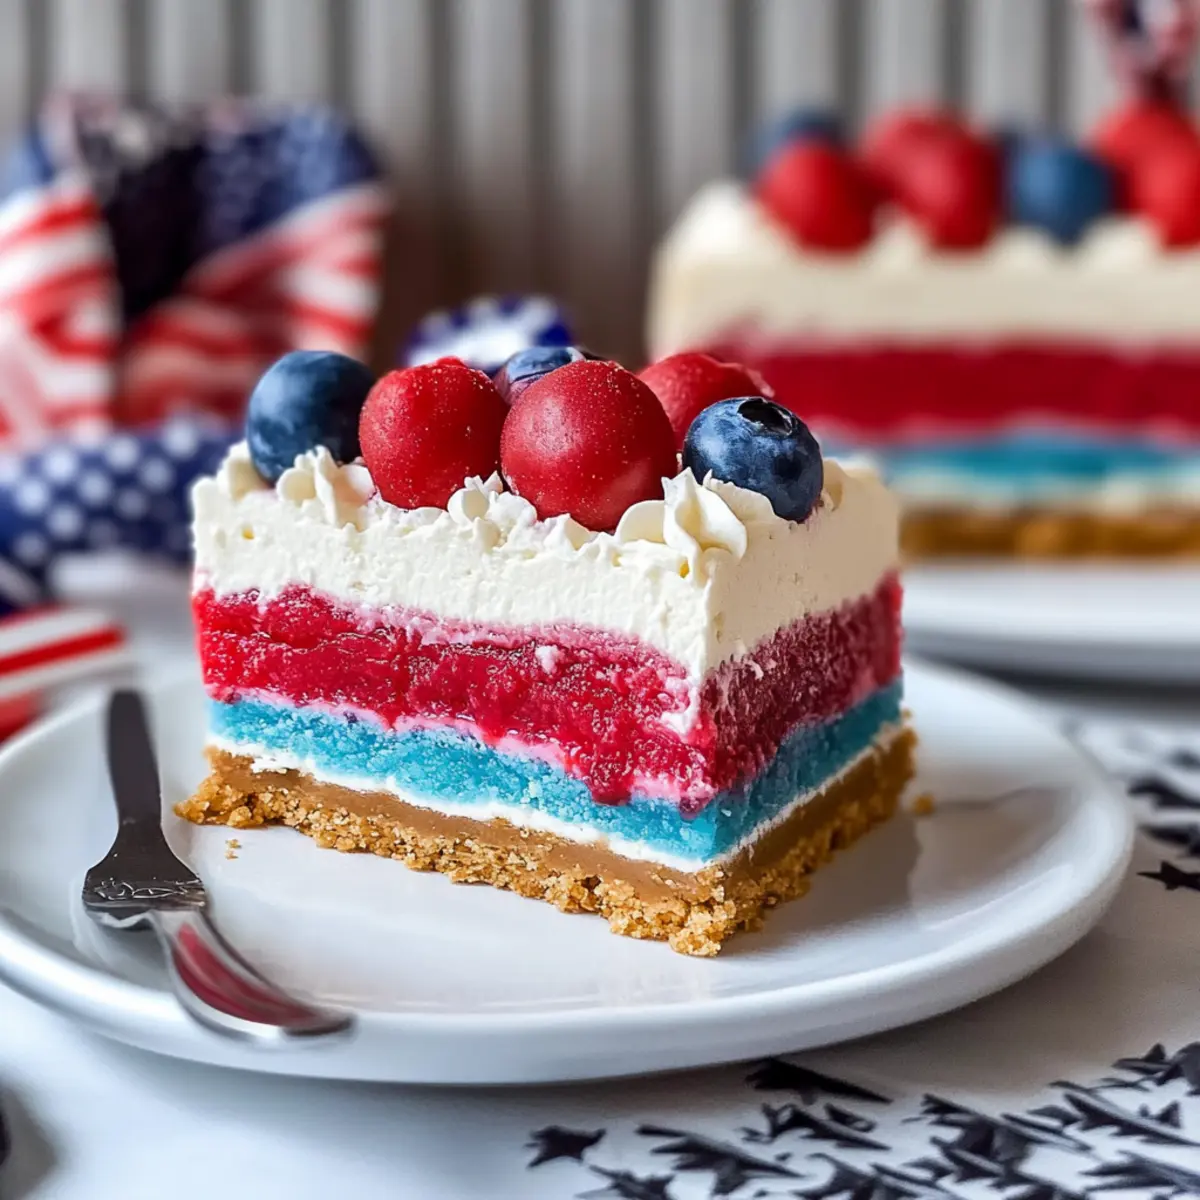
As I lifted the lid off the colorful treat, I was instantly transported back to summer days, where the sweet splashes of cherry, blue raspberry, and lime filled the air. These No-Bake Bomb Pop Cheesecake Bars are not just a dessert; they’re a celebration of flavor and fun, especially when the 4th of July festivities roll around. With their eye-catching red, white, and blue layers, these creamy delights rest on a delightful graham cracker crust, inviting friends and family to dig in. Best of all, they require minimal prep, making this festive treat a perfect no-bake solution for those hot summer days. Plus, the joy of creating and sharing a dessert that looks so magical will surely make you the star of the barbecue! Are you ready to bring a taste of nostalgia to your gathering with these vibrant cheesecake bars?
Why Are These Cheesecake Bars So Special?
Colorful Layers: The vibrant red, white, and blue hues make these bars a showstopper at any summer gathering, perfect for the 4th of July.
No-Bake Magic: Avoid turning on the oven! This recipe is refreshingly simple, requiring just a chill time to set.
Timeless Flavors: Experience the nostalgic taste of classic Bomb Pop ice cream in a cheesecake form, featuring cherry, blue raspberry, and lime.
Crowd-Pleasing Delight: With creamy texture and a crunchy crust, these bars are a hit with kids and adults alike, setting the stage for seconds!
Versatile Options: Feel free to switch up the flavors or crust to suit your preference; experiment with fruity purees for an extra twist! For more tasty no-bake ideas, try our delicious Key Lime Cheesecake or refreshing Cheesecake Fruit Salad.
Bomb Pop Cheesecake Bars Ingredients
• Get ready to whip up these no-bake beauties with this colorful combination!
For the Crust
- Graham Cracker Crumbs – Provides structure and crunch to the crust. Substitution: Can use crushed cookies (like Oreos) for a different flavor.
- Granulated Sugar – Sweetens the crust. Substitution: Coconut sugar or Stevia can work for lower-calorie versions.
- Unsalted Butter (melted) – Binds the crust together. Note: Ensure it’s melted for easy mixing.
For the Cheesecake Filling
- Heavy Cream – Creates the light and fluffy texture of the filling. Substitution: Whipped coconut cream for a dairy-free option.
- Cream Cheese (softened) – Adds richness and creaminess to the filling. Note: Use full-fat for best texture.
- Powdered Sugar – Sweetens and stabilizes the cheesecake mixture. Substitution: Use granulated sugar but expect a different texture.
- Vanilla Extract – Enhances flavor depth. Substitution: Almond extract for a nuttier hint.
- Lime Juice (optional) – Adds tanginess and brightness to the filling. Note: Can be omitted for a milder flavor.
For the Color
- Red/Blue Food Coloring – Used for color layering in the cheesecake. Note: Natural coloring alternatives are available.
- Cherry/Blue Raspberry Extract (optional) – Enhances flavor depth. Substitution: Use fruit purees for a natural flavor.
With these colorful ingredients, you’re all set to create the delightful Bomb Pop Cheesecake Bars that are sure to dazzle at your 4th of July bash!
Step‑by‑Step Instructions for Bomb Pop Cheesecake Bars
Step 1: Prepare the Crust
Start by mixing 1 ½ cups of graham cracker crumbs, ¼ cup granulated sugar, and ½ cup melted unsalted butter in a medium bowl until combined. Transfer this mixture into a 9×9 inch square baking dish, pressing it firmly into an even layer across the bottom. Chill the crust in the refrigerator for about 15 minutes until set.
Step 2: Make Cheesecake Filling
In a large mixing bowl, beat 16 ounces of softened cream cheese with an electric mixer until it’s completely smooth and creamy. Gradually add ½ cup powdered sugar, 1 teaspoon vanilla extract, and optional 2 tablespoons lime juice, mixing until all ingredients are well incorporated. The texture should be fluffy and light, perfect for the Bomb Pop Cheesecake Bars.
Step 3: Whip the Cream
In a separate medium bowl, whip 1 cup of heavy cream using an electric mixer until stiff peaks form, which should take about 3 to 5 minutes. Be careful not to overwhip, as you want it light and airy. This whipped cream will add a delightful fluffiness to your cheesecake filling, so gently fold it into the cream cheese mixture until just combined.
Step 4: Divide and Color
Divide the cheesecake filling into three equal portions in separate bowls. Using red and blue food coloring, dye one portion red (for cherry) and the other blue (for blue raspberry), leaving the third portion white. Mix gently to incorporate the colors, creating vibrant layers for your Bomb Pop Cheesecake Bars.
Step 5: Layer Cheesecake
Remove the chilled crust from the fridge and start layering. Spoon the red cheesecake filling over the crust and spread it evenly with a spatula. Carefully add the white layer next, smoothing it on top of the red layer, and finally, spoon on the blue filling, ensuring each layer is even and smooth for a beautiful presentation.
Step 6: Chill and Set
Cover the baking dish with plastic wrap and refrigerate the cheesecake bars for at least 4 hours, or overnight if possible. This step is crucial for the cheesecake to fully set and for the flavors to meld together, giving you those perfect, creamy Bomb Pop Cheesecake Bars.
Step 7: Serve
Once chilled, remove the cheesecake from the fridge and lift it out by the edges of the parchment paper. Cut it into squares using a sharp knife for clean edges. Serve chilled, and feel free to garnish with fresh berries or whipped cream, elevating your festive 4th of July dessert experience with these delightful Bomb Pop Cheesecake Bars.
What to Serve with Bomb Pop Cheesecake Bars
Looking to create a memorable summer feast to complement your vibrant cheesecake bars?
-
Ice-Cold Lemonade: The refreshing citrus notes of lemonade perfectly balance the sweetness of the Bomb Pop Cheesecake Bars, quenching your thirst on a hot day.
-
Grilled Hot Dogs: A classic favorite at summer gatherings. Their savory flavor pairs well with the sweet, fruity notes of your cheesecake bars.
-
Fruit Salad: A colorful medley of juicy fruits adds freshness and a light, healthy touch to your dessert spread, enhancing the overall experience.
-
Patriotic Strawberries: Drizzle fresh strawberries with white chocolate and blue sprinkles for a fun, colorful treat that echoes your cheesecake bars and delights all ages.
-
Crunchy Coleslaw: This zesty side dish offers a contrasting crunch and tanginess, balancing the creamy, rich flavors of the cheesecake.
-
Sparkling Water with Lime: Add a splash of lime to sparkling water for a refreshing drink that complements both the cheesecake and the festive 4th of July theme.
Remember, the goal is to create a vibrant, fun-filled atmosphere that invites friends and family to indulge in delicious flavors together!
How to Store and Freeze Bomb Pop Cheesecake Bars
Fridge: Store leftover Bomb Pop Cheesecake Bars in an airtight container in the refrigerator for up to 3 days. This keeps them fresh and ready for a sweet treat anytime!
Freezer: For longer storage, freeze cheesecake bars in a freezer-safe container for up to 1 month. Wrap each piece individually in plastic wrap to prevent freezer burn.
Thawing: To enjoy frozen bars, simply transfer them to the fridge for about 2-4 hours to thaw before serving. This makes for a delightful, chilled dessert!
Serving Suggestions: After thawing, consider garnishing your bars with fresh berries or whipped cream for an extra festive touch at your next gathering.
Bomb Pop Cheesecake Bars Variations
Customize your Bomb Pop Cheesecake Bars for an even more exciting treat that dazzles with flavor and presentation!
- Dairy-Free: Swap heavy cream for whipped coconut cream and use dairy-free cream cheese for a creamy, vegan-friendly dessert.
- Gluten-Free: Replace graham cracker crumbs with gluten-free cookie crumbs for a tasty crust that everyone can enjoy.
- Chocolate Twist: Use chocolate sandwich cookies for the crust, adding a rich flavor that complements the fruity layers beautifully.
- Fruit Purees: Incorporate real fruit purees instead of extracts for a fresher taste; consider raspberry and lime for a vibrant color mix!
- Extra Crunch: Add crushed nuts or sprinkles on the top layer for delightful texture and an added festive flair.
- Spicy Surprise: Mix in a pinch of cayenne pepper or cinnamon to the filling for a subtle kick that surprises the palate.
- Mini Version: Transform these bars into individual cups for a fun presentation; layer in small glasses for the perfect party treat.
- Flavor Fusion: Combine different extracts, like almond and vanilla, to create a unique flavor profile that elevates your cheesecake experience.
Your festively bright Bomb Pop Cheesecake Bars can be as unique as your gatherings! For more exciting flavor ideas, don’t forget to check out our Fruity Pebbles Cheesecake and the refreshing Patriotic Hot Fudge for inspiration!
Expert Tips for Bomb Pop Cheesecake Bars
-
Room Temperature Cream Cheese: Make sure your cream cheese is softened at room temperature to blend smoothly into the mixture. Cold cream cheese can lead to lumps.
-
Gentle Whipping: When whipping the cream, be careful not to overwhip. Stop once you see stiff peaks to maintain that airy texture in your Bomb Pop Cheesecake Bars.
-
Layer with Care: Use a spatula to spread each layer evenly; this helps create distinct colors and layers. Avoid mixing them together for a beautiful finish.
-
Chill Time Matters: Allow sufficient chilling time, preferably overnight. This ensures that your bars are well-set and the flavors meld perfectly.
-
Taste as You Go: Don’t hesitate to taste your cheesecake filling before layering. You can adjust the sweetness or flavor to match your preference, giving you that personalized touch!
Make Ahead Options
These Bomb Pop Cheesecake Bars are perfect for meal prep, making your holiday gatherings a breeze! You can prepare the graham cracker crust and cheesecake filling up to 24 hours in advance. Simply mix the crust ingredients and press them into your baking dish, then refrigerate. For the filling, you can whip the cream cheese mixture and store it in the fridge in separate bowls (colored layers) until you’re ready to layer—it helps to keep colors vibrant and flavors fresh. When it’s time to serve, just layer the fillings over the chilled crust, let them set for a few hours, and you’ll have a stunning dessert that tastes just as delicious, saving you precious time on the big day!
Bomb Pop Cheesecake Bars Recipe FAQs
What is the best way to choose ripe ingredients for the cheesecake filling?
Absolutely! For the best flavor, ensure your cream cheese is softened properly at room temperature—this helps to achieve a smooth texture. Look for heavy cream that is fresh; the heavier and thicker, the better for attaining stiff peaks. If using fruit purees, choose ripe, flavorful fruits to enhance the taste of your Bomb Pop Cheesecake Bars.
How should I store leftover Bomb Pop Cheesecake Bars?
I recommend placing any leftovers in an airtight container in the refrigerator, where they will stay fresh for up to 3 days. This keeps the bars deliciously creamy and ready to enjoy as a sweet treat anytime! Just be sure to avoid leaving them out for extended periods to maintain that delightful texture.
Can I freeze Bomb Pop Cheesecake Bars?
Yes, you can! To freeze, wrap each bar individually in plastic wrap and then place them in a freezer-safe container. They will keep well for up to 1 month. When you’re ready to enjoy them, simply move the bars to the fridge for about 2-4 hours to thaw. This makes for an easy and refreshing dessert whenever you need it!
What should I do if my cheesecake bars are too soft after chilling?
No worries! If your Bomb Pop Cheesecake Bars are too soft, it could be due to insufficient chilling time. Make sure to chill them for at least 4 hours, or preferably overnight, to allow them to set properly. If they still don’t firm up, it might be helpful to add a bit more powdered sugar to the mixture next time or whip the cream to stiffer peaks before folding it in gently.
Are any ingredients in Bomb Pop Cheesecake Bars allergenic?
Yes, this recipe contains dairy and gluten. For those with dairy allergies, feel free to substitute with whipped coconut cream for the filling and ensure your cream cheese is a dairy-free alternative. If gluten is a concern, consider using gluten-free graham cracker crumbs or a cookie crust made from gluten-free cookies. Always check packaging for specifics if allergies are present.
Can I add different flavors or ingredients to this recipe?
Very much! The beauty of these cheesecake bars lies in their versatility. You can easily switch flavor extracts—like using raspberry instead of cherry—or incorporate fruit purees for a more natural taste. You can also experiment with different crusts, such as cookie crusts made from chocolate or ginger cookies, to tailor your Bomb Pop Cheesecake Bars to your taste!
Colorful Bomb Pop Cheesecake Bars for Your 4th of July Bash
Ingredients
Equipment
Method
- Mix graham cracker crumbs, granulated sugar, and melted unsalted butter in a medium bowl until combined. Transfer to a 9x9 inch baking dish, pressing firmly into an even layer. Chill for about 15 minutes until set.
- In a large bowl, beat softened cream cheese until smooth. Gradually add powdered sugar, vanilla extract, and optional lime juice, mixing until fluffy.
- Whip heavy cream in a separate bowl until stiff peaks form, about 3 to 5 minutes. Gently fold into the cream cheese mixture.
- Divide the cheesecake filling into three bowls. Dye one portion red, another blue, and leave the third white.
- Layer the red filling on the crust, followed by the white layer, and then the blue layer, smoothing each one evenly.
- Cover the dish with plastic wrap and refrigerate for at least 4 hours or overnight to set.
- Remove from fridge, lift out by edges of parchment paper, and cut into squares. Serve chilled, garnished with fresh berries or whipped cream.
Leave a Reply