
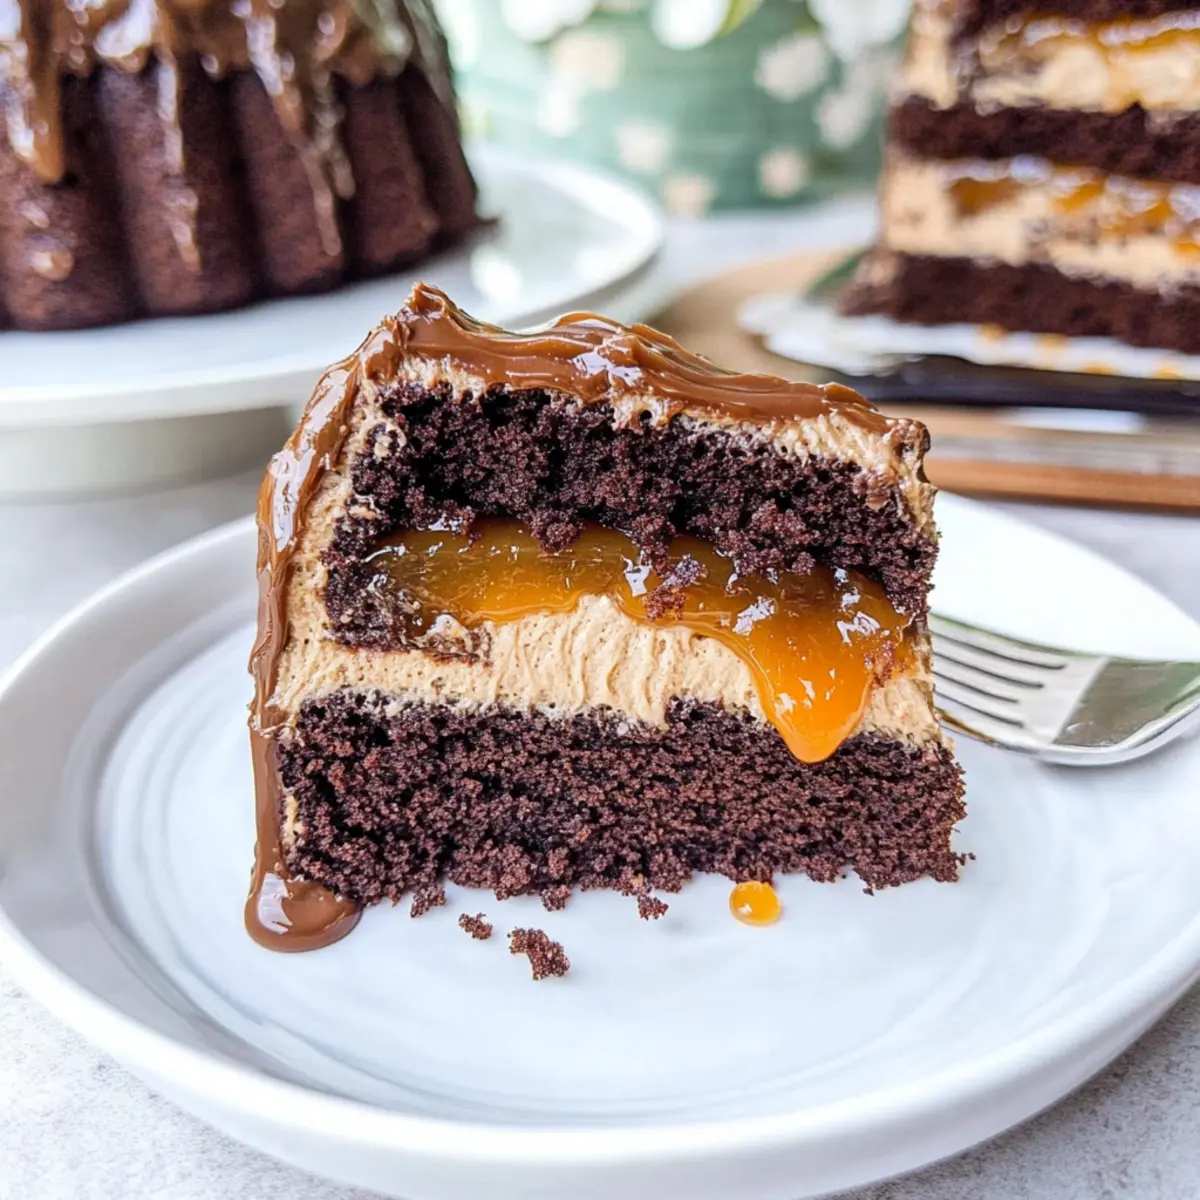
As I lifted the lid off my cake stand, the rich aroma of chocolate enveloped the room, drawing everyone closer. This Chocolate and Salted Caramel Cake is not just a dessert; it’s a moment of sheer bliss that transforms any gathering into a celebration. With fluffy chocolate layers and a decadent salted caramel filling, it strikes that perfect balance between sweet and savory, ensuring that every bite is an experience worth savoring. Not only is this cake a showstopper, but it’s also surprisingly easy to make, allowing even novice bakers to shine. Plus, with variations to create cupcakes or adjust for dietary needs, it’s versatile enough to please a crowd. So, are you ready to dive into a world where chocolate dreams meet salty caramelly delights?
Why is this cake a must-try?
Decadence on a Plate: This Chocolate and Salted Caramel Cake is an indulgent masterpiece that will impress friends and family alike. Gourmet Flavor: The combination of rich chocolate and subtle hints of sea salt elevates your dessert game to café standards. Effortless Baking: With straightforward steps, even beginner bakers can create this culinary delight. Versatile Options: Whether you want to make breath-taking cupcakes or a tiered cake, this recipe is adaptable for any occasion. Plus, enjoy other delicious treats like Coconut Cloud Cake or Chocolate Marshmallow Swirl Cookies that also showcase simple yet impressive flavor pairings.
Chocolate and Salted Caramel Cake Ingredients
• Dive into the deliciousness with these key components!
For the Cake
- All-Purpose Flour – Provides structure. Substitution: Gluten-free flour can be used to make it gluten-free.
- Granulated Sugar – Adds sweetness and moisture. Prep Note: Measure accurately for best texture.
- Unsweetened Cocoa Powder – Gives chocolate flavor and color. Ensure it is sifted to avoid lumps.
- Baking Powder & Baking Soda – Leavening agents for rise. Make sure both are fresh for optimal results.
- Fine Salt – Enhances flavor. Adjust based on dietary needs.
- Warm Water – Activates dry ingredients. Use water hot to ensure proper mixing.
- Buttermilk – Adds moisture and tang. Substitution: Milk with vinegar or yogurt can be used.
- Vegetable or Canola Oil – Keeps the cake moist. Substitution: Melted coconut oil for a flavor twist.
- Eggs – Provide structure and richness. Must be at room temperature for even incorporation.
- Vanilla Extract – Adds flavor depth. Substitution: Vanilla bean paste for a more intense flavor.
For the Caramel
- Unsalted Butter – Essential for creaminess and richness. Butter should be at room temperature for mixing.
- Heavy Whipping Cream – Contributes richness to fillings and frosting. Ensure it is at room temperature to prevent seizing.
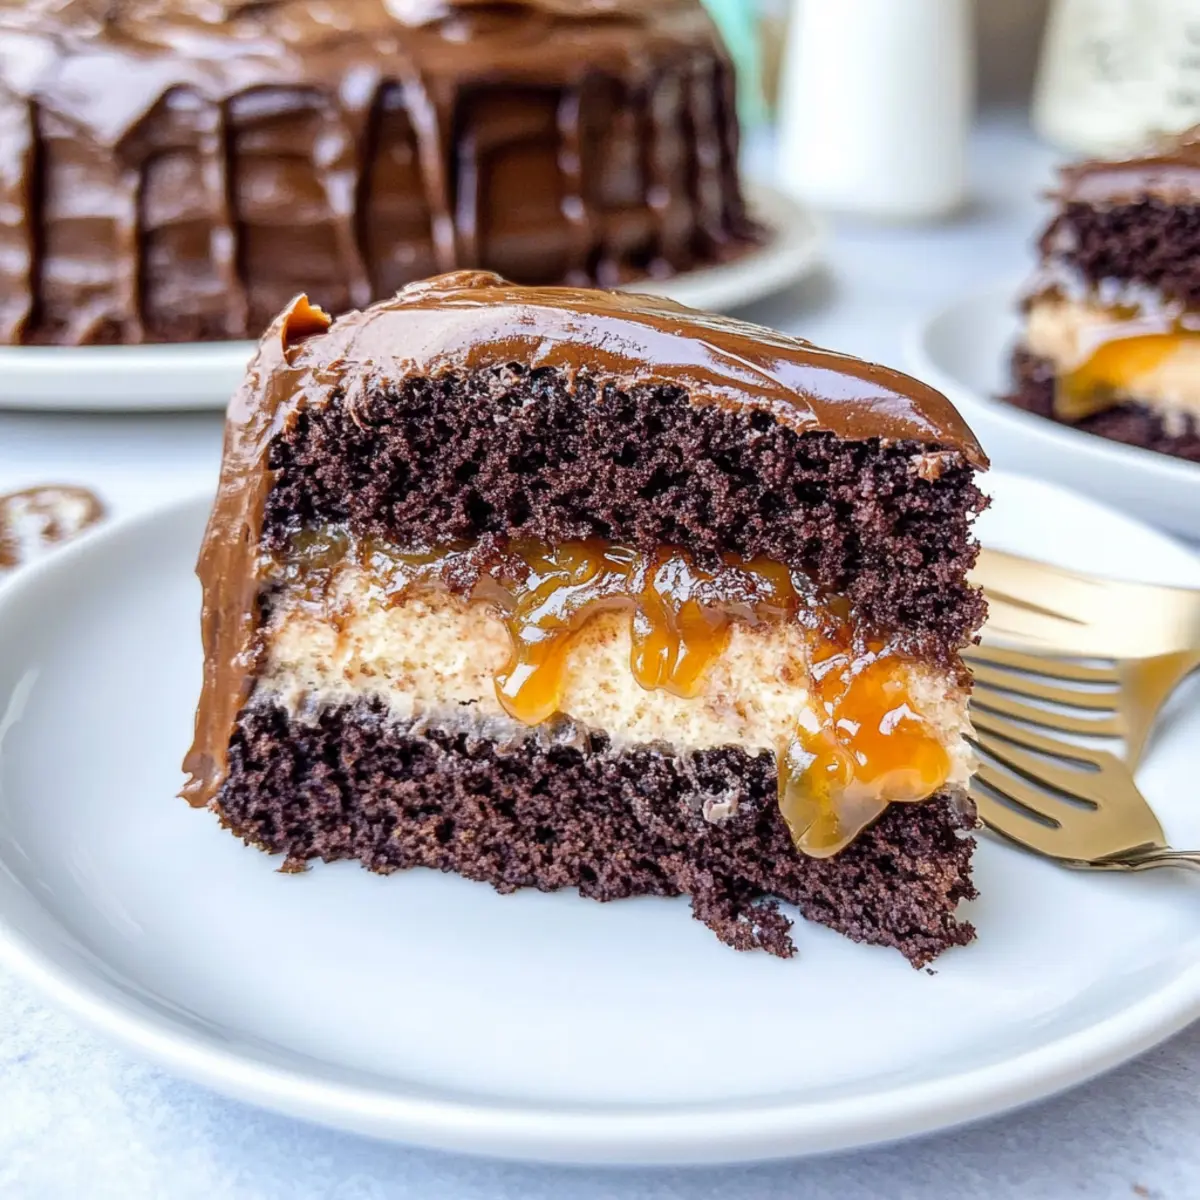
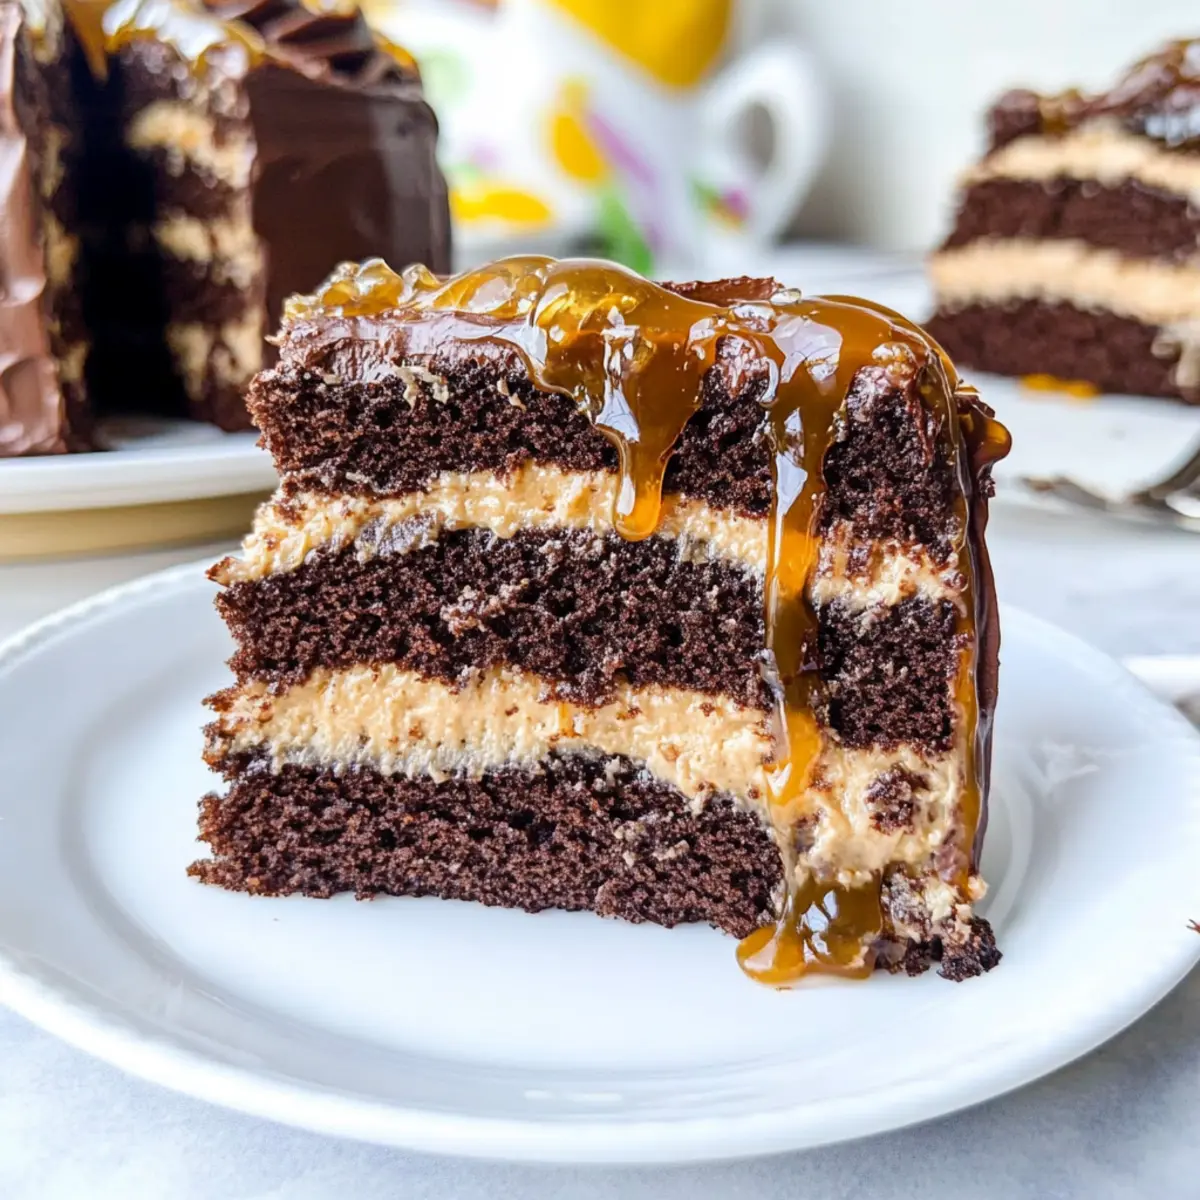
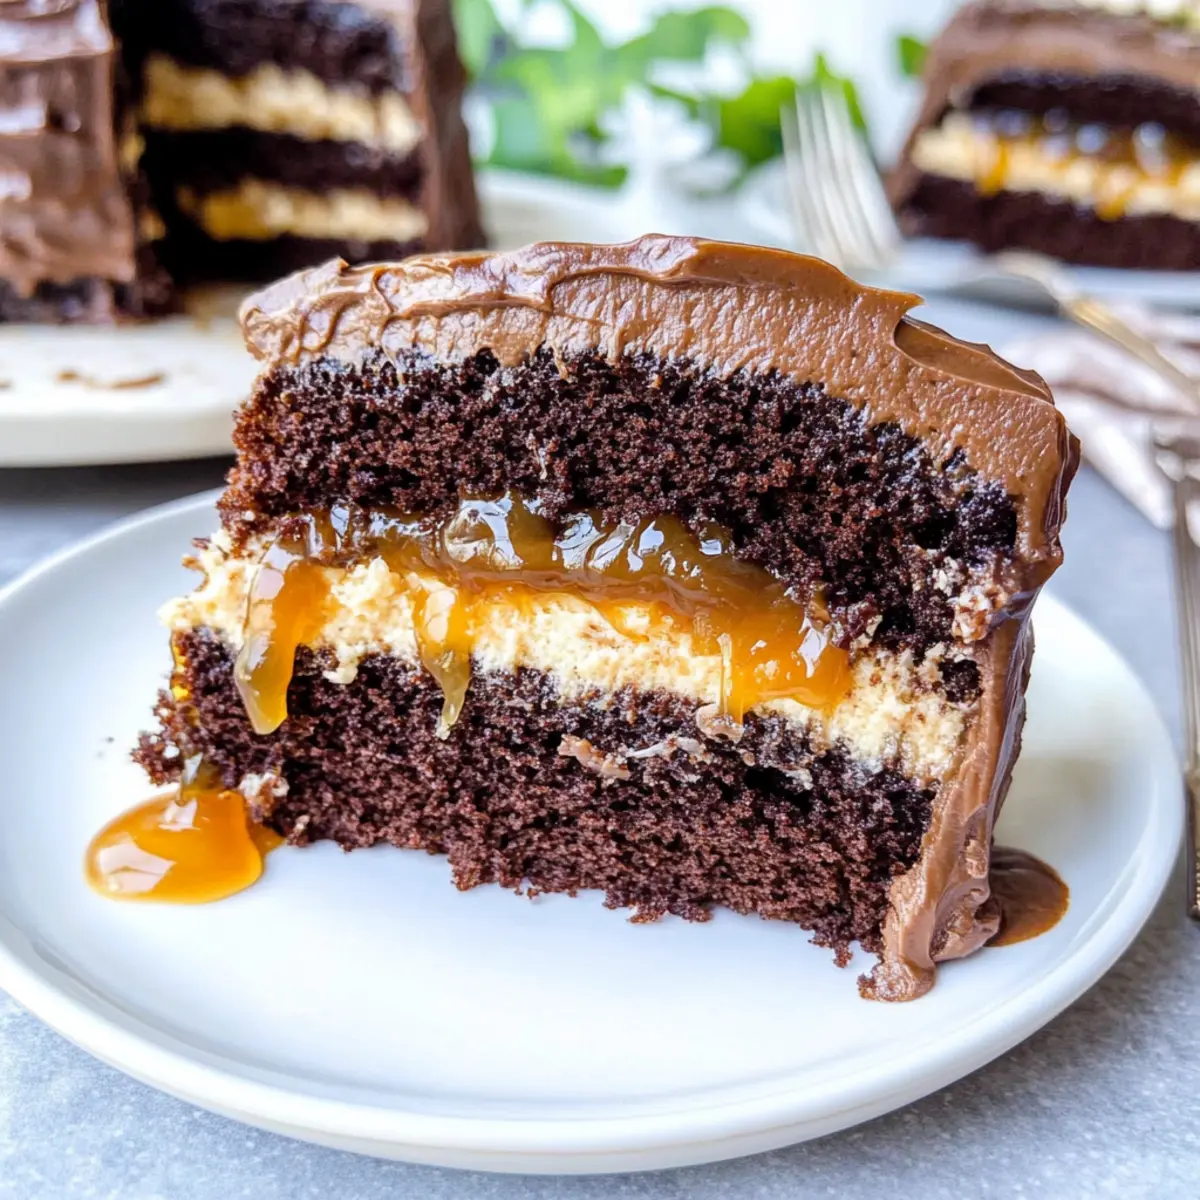
- Caramel Filling – Adds a sweet, buttery flavor with a touch of salt. Can use thick store-bought caramel as an alternative.
For the Frosting
- Dark Chocolate – Provides a rich chocolate flavor. Melt and cool before adding to buttercream.
- Flaky Sea Salt – For garnish. Enhances flavor and adds a crunchy texture finish.
Get ready to bring this Chocolate and Salted Caramel Cake to life with these luscious ingredients!
Step‑by‑Step Instructions for Chocolate and Salted Caramel Cake
Step 1: Preheat Oven and Prepare Pans
Start by preheating your oven to 350°F (175°C). While it warms up, prepare three 8-inch cake pans by lining the bottoms with parchment paper and greasing the sides with non-stick spray. This will ensure your Chocolate and Salted Caramel Cake layers come out perfectly without sticking.
Step 2: Combine Dry Ingredients
In a large mixing bowl, sift together the all-purpose flour, granulated sugar, unsweetened cocoa powder, baking powder, baking soda, and fine salt. This step is essential for aerating the ingredients and preventing lumps, setting a solid foundation for your cake. Make sure to thoroughly mix the dry ingredients together until they are well combined.
Step 3: Mix Wet Ingredients
In a separate bowl, whisk together the warm water, buttermilk, vegetable oil, eggs, and vanilla extract until everything is fully integrated. The warm water helps to activate the dry ingredients. It’s crucial that your eggs are at room temperature for a smooth batter. Once combined, pour this mixture into your bowl of dry ingredients.
Step 4: Combine Mixtures
Gently fold the wet ingredients into the dry ingredients using a spatula. Be careful not to overmix; you want to keep the batter light and fluffy. Mix just until combined, and you can no longer see any dry flour. This is an important step for creating the melt-in-your-mouth texture of the Chocolate and Salted Caramel Cake.
Step 5: Bake Layers
Divide the batter evenly among the prepared cake pans. Place them in the preheated oven and bake for 23-25 minutes. You’ll know the layers are ready when a toothpick inserted in the center comes out with a few moist crumbs clinging to it. Keep an eye on them towards the end to prevent overbaking.
Step 6: Cool Layers
Once baked, remove the pans from the oven and allow them to cool in the pans for about 10 minutes. After that, if you like, you can transfer the pans to the freezer for 30 minutes to cool them down further before removing the cake layers. This helps them hold their shape when you frost the Chocolate and Salted Caramel Cake.
Step 7: Make Caramel
In a heavy-bottomed saucepan over medium heat, cook granulated sugar until it melts and turns a deep amber color. Carefully stir in the unsalted butter, followed by the heavy whipping cream and flaky sea salt until the mixture is smooth. Allow the caramel to cool slightly before using it in your cake.
Step 8: Prepare Buttercream
In a mixing bowl, beat the room temperature unsalted butter until creamy. Gradually add powdered sugar and a splash of heavy cream, mixing until smooth. Once well combined, slowly incorporate your cooled caramel. This creates a luscious buttercream perfect for layering between your cake.
Step 9: Assemble Cake
Place the first cake layer on your serving plate. Spread a generous amount of caramel buttercream over the top, then place the second layer on top and repeat the process. After adding the third layer, create a ring of buttercream around the edges to hold in the caramel filling, which adds a delightful surprise.
Step 10: Chill Cake
Once assembled, place the entire cake in the freezer for about 20 minutes or in the refrigerator for 30 minutes to allow it to set. This will help your layers stay stable and make frosting easier. While it chills, you can prepare the chocolate frosting.
Step 11: Final Frosting
Frost the cooled cake with the rich chocolate buttercream, ensuring to cover all sides. Drizzle any remaining salted caramel over the top and garnish with a sprinkle of flaky sea salt. This final touch will not only enhance flavor but also add a beautiful finishing touch to your Chocolate and Salted Caramel Cake.
Chocolate and Salted Caramel Cake Variations
Feel free to let your creativity shine with these fun twists on the recipe!
-
Dairy-Free: Substitute buttermilk with almond milk mixed with vinegar for a deliciously dairy-free version. It retains the cake’s moisture with a similar tang.
-
Gluten-Free: Swap all-purpose flour for a gluten-free flour blend. Be sure to check for the right measurements to keep the cake’s texture light and fluffy.
-
Cupcake Version: Transform this recipe into tempting cupcakes by dividing the batter into cupcake liners and baking for 18-21 minutes. Perfect for parties or grab-and-go treats!
-
Nutty Addition: Fold in chopped nuts, like pecans or walnuts, into the cake batter for an extra crunch and flavorful surprise. It adds a delightful texture alongside the chocolate and caramel.
-
Flavored Fillings: Replace the caramel filling with fruit preserves or chocolate ganache. A raspberry or cherry preserve adds a fruity zing that contrasts beautifully with the chocolate.
-
Spice It Up: Add a pinch of cinnamon or espresso powder to the batter for a warm, rich depth of flavor, enhancing the chocolate experience for every bite.
-
Healthy Swaps: Use unsweetened applesauce instead of oil for a lower-fat alternative. This keeps the cake moist while reducing calories.
-
Layered Delight: Create a tiered cake for special occasions by using the recipe to make two or three layers, increasing the caramel and frosting between layers for a stunning display!
Each of these variations offers a unique twist, making sure that everyone at the table finds their favorite version. Enjoy crafting your masterpiece, and don’t forget to pair it with a slice of Strawberry Shortcake Ice or some delicious Firecracker Chocolate Truffles for additional flavor fun!
How to Store and Freeze Chocolate and Salted Caramel Cake
-
Fridge: Store the fully baked cake in an airtight container for up to 1 week. This keeps it moist and fresh, ready to delight your taste buds at any moment.
-
Freezer: For longer storage, wrap unfrosted cake layers in plastic wrap and aluminum foil, then freeze for up to 3 months. This way, you can enjoy this Chocolate and Salted Caramel Cake anytime!
-
Thawing: To enjoy, thaw the cake in the fridge overnight before frosting or serving. This gradual thawing preserves the cake’s texture.
-
Reheating: If you prefer a warm slice, gently microwave pieces for about 10-15 seconds. Just be cautious not to overheat, as the chocolate may become melty!
What to Serve with Chocolate and Salted Caramel Cake
Picture this: a blissful gathering where laughter resonates, and the aroma of chocolate cake drifts through the room. Pair your decadent creation with delightful sides to enhance the experience.
-
Creamy Vanilla Ice Cream: This classic pairing adds a refreshing contrast to the rich cake, creating a perfect balance of flavors.
-
Fresh Berries Medley: Juicy strawberries and tart raspberries offer a vibrant color pop and a tangy bite, complementing the sweetness wonderfully.
-
Espresso or Coffee: The bold taste of coffee cuts through the cake’s richness, making every bite feel like a gourmet experience.
-
Chocolate Ganache Tart: For the ultimate chocolate lover’s dream, serve a silky tart alongside the cake for an extra layer of indulgence.
-
Whipped Cream Clouds: Light, fluffy whipped cream is the ideal partner, providing a soft texture that enhances the cake’s decadence.
-
Caramel Sauce Drizzle: A drizzle of warm caramel on the plate brings an extra touch of indulgence and ties in beautifully with the cake.
Each of these pairings adds a unique twist, enhancing your Chocolate and Salted Caramel Cake experience while inviting everyone to savor the moment!
Expert Tips for Chocolate and Salted Caramel Cake
-
Room Temperature Ingredients: Ensure all ingredients, especially eggs and butter, are at room temperature. This creates a smoother batter for your Chocolate and Salted Caramel Cake.
-
Don’t Overmix: Mix just until combined when folding wet into dry ingredients. Overmixing can lead to a dense cake, removing the lightness you desire.
-
Chill for Stability: After assembling your cake, chilling it helps stabilize the layers and makes frosting easier. This step prevents crumbling during decoration.
-
Use a Heavy-Bottomed Pan: When making caramel, a heavy-bottomed saucepan ensures even heat distribution. This reduces the risk of burning your sugar.
-
Add Moisture with Buttermilk Alternative: If you need a dairy-free version, substitute regular buttermilk with almond milk mixed with vinegar or yogurt to keep that tangy flavor without compromising texture.
-
Take Care with Caramel: If your caramel mixture seizes, gently warm it and stir until smooth. This allows you to achieve that silky drizzle over your cake!
Make Ahead Options
These Chocolate and Salted Caramel Cake layers are perfect for busy weeknights or any meal prep enthusiast! You can bake the cake layers up to 3 days in advance, allowing them to cool completely before wrapping them tightly in plastic wrap. For even better flavor, store the layers in the fridge. The caramel filling can also be prepared ahead of time and stored in an airtight container for up to 1 week. When you’re ready to finish the cake, simply reassemble the chilled layers with the prepared buttercream and drizzle with salted caramel. This way, you’ll have a stunning dessert ready with minimal effort and just as delicious when it’s time to indulge!
Chocolate and Salted Caramel Cake Recipe FAQs
What ingredients should I use for the best chocolate flavor?
For the richest chocolate flavor in your Chocolate and Salted Caramel Cake, use high-quality unsweetened cocoa powder, ideally Dutch-processed. Ensure it’s sifted to prevent lumps that can impact the texture. Additionally, using dark chocolate in the frosting will significantly enhance the cake’s overall chocolate depth.
How can I store my cake to keep it fresh?
Absolutely! To keep your fully baked Chocolate and Salted Caramel Cake fresh, store it in an airtight container in the fridge for up to 1 week. This helps maintain its moisture. For longer storage, wrap the unfrosted layers tightly in plastic wrap followed by aluminum foil and freeze them for up to 3 months.
Can I freeze the layers for later use?
Yes, you can! To freeze the layers of your Chocolate and Salted Caramel Cake, allow them to cool completely first. Wrap each layer carefully in plastic wrap, and then in aluminum foil to prevent freezer burn. This way, they can last up to 3 months. When you’re ready to use them, thaw the layers in the fridge overnight before frosting.
What should I do if my caramel seizes or hardens?
If your caramel hardens while cooking or after cooling, don’t worry! Simply place the hardened caramel back on low heat and add a splash of heavy cream or water. Stir continuously until it becomes smooth and creamy again. This is a common issue, and it’s easily fixable to ensure your cake remains as delightful as intended.
Are there any allergen alternatives for this recipe?
Absolutely! If you’re looking to make your Chocolate and Salted Caramel Cake more inclusive, you can substitute the buttermilk with almond milk mixed with a tablespoon of vinegar or yogurt for a dairy-free option. Additionally, using gluten-free flour can accommodate those with gluten sensitivities while still producing a delicious cake. Adjust sugar types or use egg substitutes for more modifications as needed!
Decadent Chocolate and Salted Caramel Cake to Indulge In
Ingredients
Equipment
Method
- Preheat your oven to 350°F (175°C) and prepare three 8-inch cake pans by lining the bottoms with parchment paper and greasing the sides.
- In a large mixing bowl, sift together the all-purpose flour, granulated sugar, unsweetened cocoa powder, baking powder, baking soda, and fine salt.
- In a separate bowl, whisk together the warm water, buttermilk, vegetable oil, eggs, and vanilla extract until fully integrated.
- Gently fold the wet ingredients into the dry ingredients using a spatula, mixing just until combined.
- Divide the batter evenly among the prepared cake pans and bake for 23-25 minutes.
- Once baked, cool the layers in the pans for about 10 minutes, then transfer to the freezer for 30 minutes.
- In a saucepan over medium heat, cook granulated sugar until it melts and turns amber. Stir in unsalted butter, heavy cream, and flaky sea salt until smooth.
- In a mixing bowl, beat room temperature unsalted butter until creamy. Gradually add powdered sugar and heavy cream, then incorporate cooled caramel.
- Place the first cake layer on your serving plate and spread caramel buttercream on top. Add the second layer and repeat.
- After adding the third layer, create a ring of buttercream around the edges to hold in the caramel filling.
- Chill the assembled cake in the freezer for 20 minutes or in the refrigerator for 30 minutes.
- Frost the cake with chocolate buttercream and drizzle remaining salted caramel on top.
Leave a Reply