
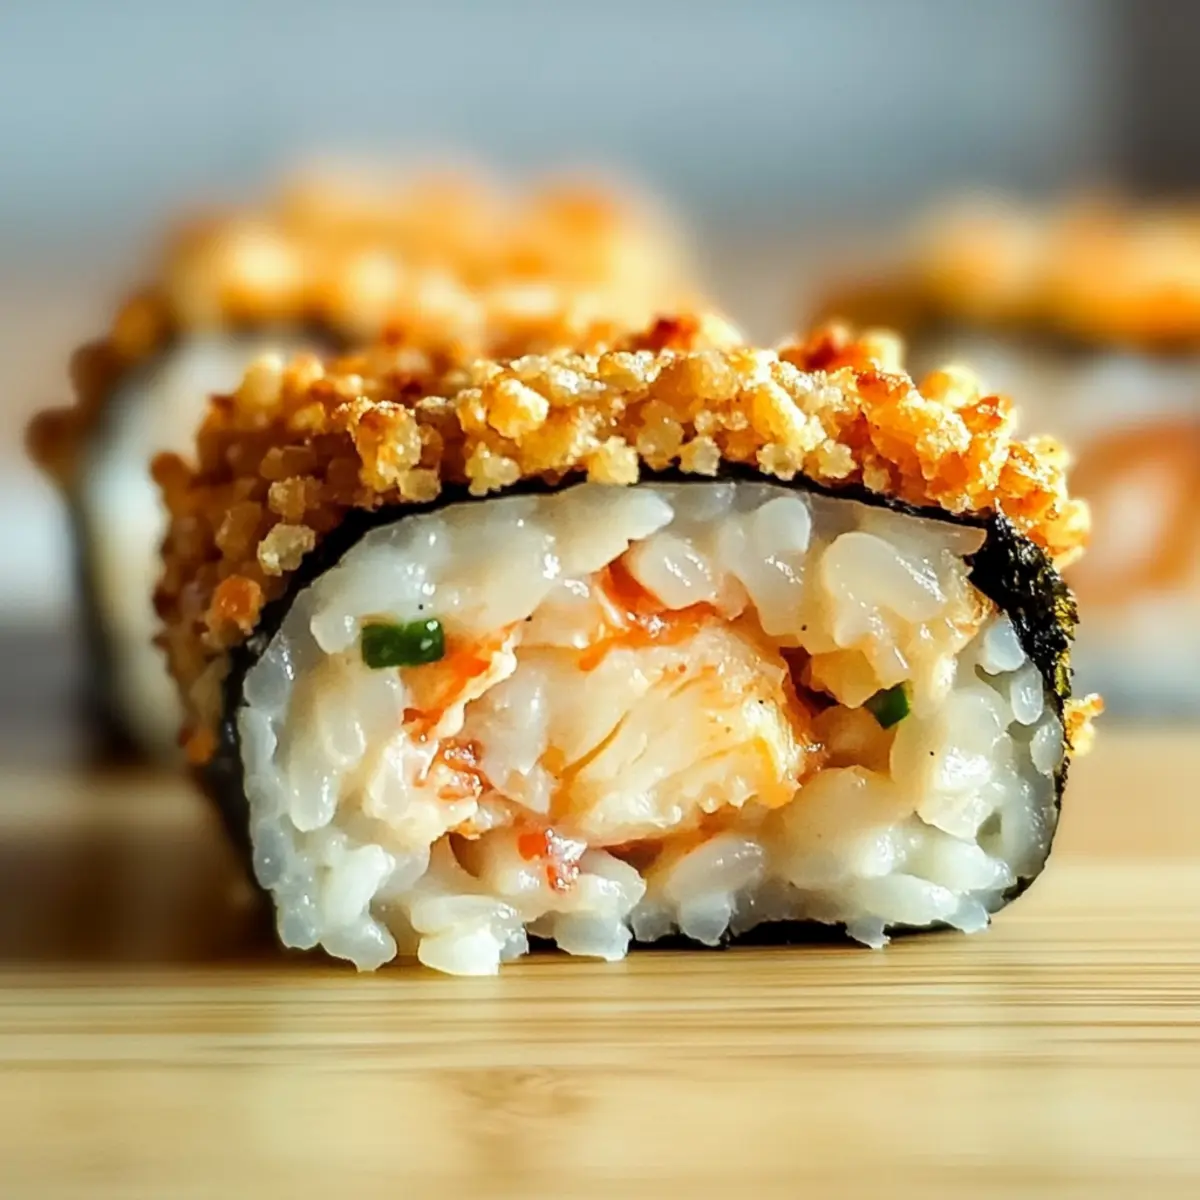
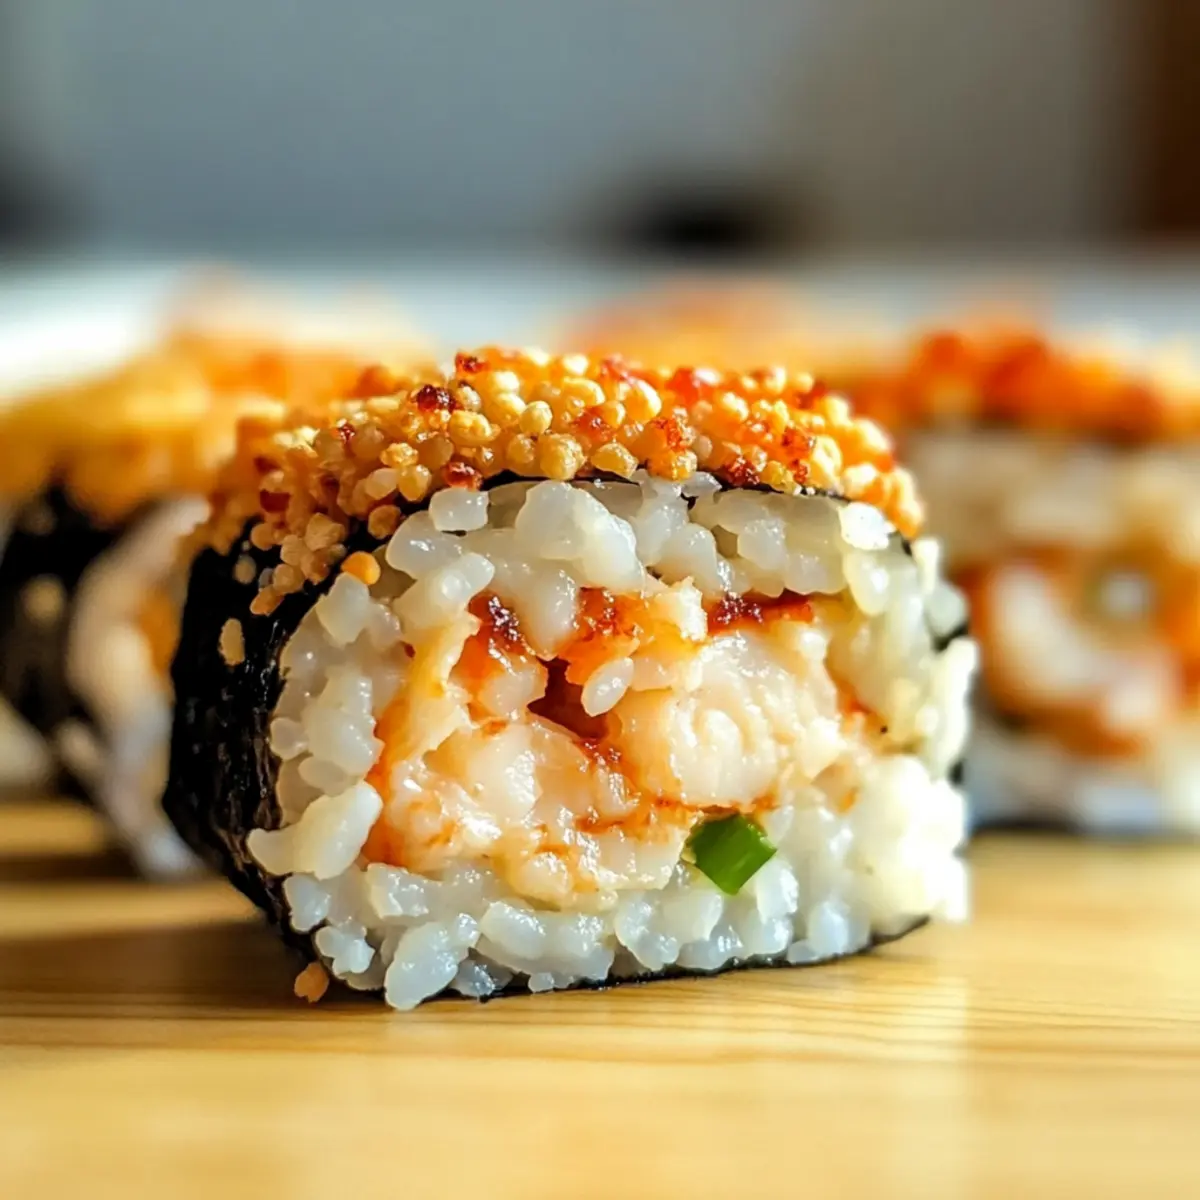
The kitchen fills with anticipation as I slide a bubbling dish of Easy Sushi Bake into the oven, the aroma already teasing my senses. This dish is my go-to for those nights when takeout feels too tempting, yet I crave something more satisfying and homemade. With the delightful crunch of crispy nori atop a creamy filling, this sushi bake brings all the flavors of traditional sushi in a warm, comforting format that’s perfect for busy weeknights. Plus, it’s a great gluten-free option, ensuring everyone can enjoy it without a fuss. Whether you’re impressing guests or just treating yourself, this Easy Sushi Bake promises to be a winner. Are you curious to uncover the secrets behind this hearty, flavorful bake? Keep scrolling to find out!
Why is Sushi Bake a Game Changer?
Convenience at its Finest: No rolling required! The Easy Sushi Bake simplifies sushi-making, combining all your favorite ingredients into a hassle-free dish.
Rich and Creamy Flavor: The blend of crab meat, cream cheese, and Japanese seasonings delivers that beloved sushi taste but in the form of a warm casserole.
Versatile Ingredients: Feel free to customize the filling—swap crab for shrimp or even tofu for a delightful vegetarian option!
Perfect for Busy Nights: Ready in just 30 minutes, it’s an ideal solution for weeknight dinners when time is tight but comfort food is a must.
Family-Friendly Appeal: Impress your loved ones with this delicious dish, or enjoy it solo—either way, it’s sure to become a favorite.
A little effort goes a long way, and for an ultimate Japanese-inspired meal, you can also try serving it alongside a fresh salad or miso soup.
Sushi Bake Ingredients
• Dive into these must-have components for a delightful sushi bake experience!
For the Base
- Nori Sheets – Provides umami flavor and crispy texture; ensure gluten-free if needed, or substitute with rice paper.
- Sushi Rice – Offers structure and absorbs all the delicious flavors; use short-grain rice for the best outcome.
For the Filling
- Canned Crab Meat – The main protein source adds richness; if desired, imitation crab or cooked shrimp can be used as alternatives.
- Cream Cheese – Contributes creaminess and binds the filling perfectly; no substitution indicated.
- Mayonnaise – Enhances the overall flavor profile; consider Greek yogurt for a healthier twist.
- Green Onions – Provides freshness and vibrant color; easily substitute with chives if preferred.
For the Flavor
- Soy Sauce – Adds a depth of umami; use tamari to keep it gluten-free.
Optional additions could include toppings such as avocado or jalapeños to enhance the experience!
Step‑by‑Step Instructions for Easy Sushi Bake
Step 1: Preheat the Oven
Begin by preheating your oven to 375°F (190°C). This ensures that your Easy Sushi Bake reaches the perfect temperature for cooking through and crisping up. While waiting, gather your baking dish and any utensils you need for the subsequent steps, so you’re all set for a smooth cooking experience.
Step 2: Prepare the Sushi Rice
Rinse the sushi rice under cold water until the water runs clear, which helps remove excess starch. Cook the rice according to package directions, typically simmering until tender, about 15-20 minutes. Once done, allow it to cool slightly; this step is crucial for achieving the right texture in your sushi bake.
Step 3: Mix the Filling
In a mixing bowl, combine canned crab meat, cream cheese, mayonnaise, and finely chopped green onions. Using a fork, mix until smooth and well-blended, ensuring the richness of the crab and cream cheese melds together. This creamy filling is the heart of your Easy Sushi Bake, providing that wonderful flavor!
Step 4: Assemble the Nori Base
Line the bottom of a baking dish with nori sheets, creating a fitting base for your sushi bake. Make sure to overlap the sheets slightly to cover the entire bottom, forming a sturdy backdrop. Then, evenly spread the cooled sushi rice over the nori, pressing it down gently to create a cohesive layer for the filling.
Step 5: Add the Crab Mixture
Spoon the prepared crab mixture onto the sushi rice layer, spreading it out evenly for a delightful taste in every bite. Ensure the mixture covers the rice completely, making it easy to scoop out portions later. This step is what takes your Easy Sushi Bake from ordinary to remarkably flavorful.
Step 6: Bake to Perfection
Place your assembled Easy Sushi Bake in the preheated oven and let it bake for 20-25 minutes. You’ll know it’s done when it’s bubbling and the top is golden brown, creating a tempting crust that adds texture. Keep an eye on it towards the end to prevent over-browning.
Step 7: Optional Crisping Step
For an extra layer of crispiness, switch on the broiler for an additional 1-2 minutes at the end of baking. Watch closely, as this step can quickly change from perfectly crisp to burnt. It gives your Easy Sushi Bake a delightful finish, enhancing both its appearance and flavor.
Step 8: Cool and Serve
Once baked, remove your Easy Sushi Bake from the oven and let it cool slightly before serving. This allows the filling to settle, making it easier to cut into portions. Serve warm with soy sauce or wasabi on the side, or pair it with a salad for a complete meal everyone will love!
What to Serve with Easy Sushi Bake
Cozy up your dinner table with delicious sides to complement this savory dish, creating a complete meal that warms the heart.
-
Creamy Miso Soup: The umami-rich broth harmonizes well with the flavors of the sushi bake, offering warmth and comfort with each sip. Pairing soup with your bake makes for a cozy duo that invites family and friends to gather around.
-
Crisp Garden Salad: A fresh salad with mixed greens, cucumbers, and a tangy sesame dressing adds a delightful crunch, balancing the creaminess of the sushi bake. Incorporate nuts for an extra layer of texture, elevating your meal’s overall experience.
-
Edamame with Sea Salt: This simple, protein-packed snack is both nutritious and delicious. Bright green edamame brings a pop of color and health benefits to your table, encouraging a fun way to enjoy your meal.
-
Avocado Slices: Creamy avocado pairs beautifully with the sushi bake, adding richness and healthy fats. Serve it on the side or atop the bake for added flair and flavor; it’s a delightful match that makes each bite even more satisfying.
-
Pickled Ginger: Vibrant and zesty, pickled ginger offers a refreshing contrast to the creamy filling of the sushi bake. Just a small serving can enliven your palate, creating an enticing experience throughout your dinner.
-
Chilled Green Tea: A refreshing beverage option that enhances your meal’s Japanese flair, chilled green tea provides lightness and a slightly bitter taste, perfectly balancing the rich flavors of the sushi bake.
Sushi Bake Variations & Substitutions
Feel free to let your creativity flourish by customizing your Sushi Bake with these delightful twists and swaps!
-
Gluten-Free:
Use tamari instead of regular soy sauce to keep this dish entirely gluten-free. If you’re craving an alternative base, try wrapping it in rice paper. -
Protein Swap:
If canned crab isn’t your thing, replace it with cooked shrimp or even tofu for a delicious vegetarian twist. Both options maintain the dish’s flavors while catering to different tastes. -
Creamy Option:
For a lighter alternative to mayonnaise, substitute Greek yogurt for a tangy spin. This swap adds health benefits without sacrificing creaminess! -
Flavor Boost:
To elevate your dish, add a splash of sriracha to the filling for a spicy kick that balances perfectly with the creamy ingredients. It’s an easy way to give your sushi bake an exciting flavor twist! -
Extra Texture:
Top your bake with sliced avocado or crispy panko bread crumbs before baking. This adds a delightful crunch and a touch of freshness, making each bite unforgettable. -
Veggie Delight:
Toss in your favorite veggies, like sliced bell peppers or mushrooms, into the crab mixture. They bring added nutrition and color, making it more vibrant and satisfying. -
Fresh Garnish:
Sprinkle sesame seeds or chopped cilantro on top just before serving for a burst of flavor and visual appeal. It’s a small touch that makes a big difference! -
Salad Pairing:
Serve your nifty sushi bake with a side of light cucumber salad or a fresh garden salad for a refreshing contrast. This keeps your meal nicely balanced and delightful!
For more scrumptious ideas, why not explore our tasty Cheesy Ground Bake or the light and zesty Bake Key Lime for dessert? Enjoy your culinary adventure!
Make Ahead Options
These Easy Sushi Bake components are perfect for meal prep! You can prepare the crab filling up to 2 days in advance and store it in an airtight container in the refrigerator, keeping it creamy and flavorful. Additionally, you can cook the sushi rice and store it separately for up to 24 hours, which allows you to combine the ingredients last minute. When you’re ready to serve, simply layer the nori and rice, spread the crab mixture on top, and bake. This approach not only saves valuable time but also ensures that your Easy Sushi Bake is just as delicious when served fresh out of the oven!
Expert Tips for Easy Sushi Bake
-
Watch the Timer: Keep an eye on your sushi bake towards the end of baking; it can brown quickly and nobody likes a burnt crust!
-
Customizable Filling: Don’t hesitate to experiment with fillings; swap crab for cooked shrimp or even veggies to cater to your palate.
-
Chill the Rice: Allow sushi rice to cool before assembling; this step helps it hold together better and creates a satisfying texture in your sushi bake.
-
Serve with Style: For an elegant touch, slice and serve with a sprinkle of sesame seeds or fresh herbs for that extra pop of flavor.
-
Store Smartly: Leftovers can be stored in an airtight container in the fridge for up to 3 days, ensuring your easy sushi bake delights for more meals!
Storage Tips for Sushi Bake
-
Fridge: Store leftovers in an airtight container for up to 3 days. This keeps your sushi bake fresh and ready for a quick reheating!
-
Freezer: Freeze individual portions in airtight containers for up to 2 months. This makes for easy, satisfying meals on busy nights!
-
Reheating: For best texture, reheat in the oven at 350°F (175°C) for about 15-20 minutes. This method ensures your sushi bake remains crispy and delicious.
-
Thawing: If frozen, thaw in the fridge overnight before reheating to maintain the flavor and quality of your sushi bake.

Sushi Bake Recipe FAQs
What type of nori should I use for this recipe?
Absolutely! For the best results, look for nori sheets that are labeled as gluten-free. These seaweed sheets provide the essential umami flavor and crispy texture that makes sushi bake delightful. If you’re unable to find gluten-free nori, you can also use rice paper as an alternative, although the texture will be slightly different.
How long can I store the Easy Sushi Bake leftovers?
Very! Leftovers can be stored in an airtight container in the fridge for up to 3 days. Simply reheat in the oven for the best texture. If you find you have more than you can eat, you can freeze individual portions for up to 2 months! Just make sure they’re well-wrapped in plastic wrap or placed in a freezer-safe container.
Can I freeze my Sushi Bake? How should I do it?
Indeed! Freezing your Easy Sushi Bake is super simple. After it cools completely, slice the sushi bake into individual portions. Wrap each portion tightly with plastic wrap and place them into an airtight container or freezer bag. This way, they can be frozen for up to 2 months. When you’re ready to enjoy, thaw in the fridge overnight and reheat in the oven!
What if my filling is too runny?
If you find your crab mixture is too runny, don’t worry! You can add a tablespoon of extra cream cheese to thicken it up. Another option is to reduce the amount of mayonnaise slightly. Mix together until well combined, and give it a taste to ensure you still love the flavor. This will help achieve that creamy consistency without making your bake too watery.
Is this recipe suitable for people with allergies?
Yes! While this Easy Sushi Bake is a fantastic gluten-free option (just ensure to use certified gluten-free nori), it does contain shellfish due to the canned crab meat. For those with allergies, you can substitute the crab with cooked shrimp or even a plant-based protein like tofu. Always double-check the ingredient labels for allergen information to ensure everyone’s safety!

Sushi Bake: A Cozy Twist for Easy Weeknight Dinners
Ingredients
Equipment
Method
- Preheat your oven to 375°F (190°C).
- Rinse the sushi rice under cold water until the water runs clear, then cook according to package directions.
- In a mixing bowl, combine canned crab meat, cream cheese, mayonnaise, and finely chopped green onions. Mix until smooth.
- Line the bottom of a baking dish with nori sheets and evenly spread the cooled sushi rice over the nori.
- Spoon the crab mixture onto the sushi rice layer and spread it out evenly.
- Bake in the preheated oven for 20-25 minutes until bubbling and golden brown.
- For extra crispiness, broil for 1-2 minutes at the end, watching closely.
- Remove from the oven and let cool slightly before serving.
Leave a Reply